30-second summary:
- A sitemap is one of the technical sides of SEO.
- A sitemap doesn’t boost your SEO traffic but helps search engines index your web pages faster.
- It’s very easy to create an XML sitemap and doesn’t require any coding knowledge.
- Once a sitemap is created, you need to submit it to Google.
- Through your Google Search Console dashboard, you can see detailed index coverage reports and fix any technical errors if present.
- Founder of WPMyWeb.com, Jyoti Ray guides you through the process of creating an XML sitemap using different tools and details on how you can fix existing sitemap errors.
When it comes to SEO, there are over hundreds of Google ranking factors you need to master as well as execute them in order to increase your search engine visibility. Believe me, it’s lots of work – generating content ideas, keyword researching, creating high-quality content, building backlinks, auditing your website, etc. And working on each of the techniques is time-consuming and requires lots of effort. Fortunately, there are some SEO techniques that are easier to perform but have a huge impact on SEO. One of them is – submitting an XML sitemap to Google.
Although a sitemap is one of the parts of “technical SEO”, it doesn’t require any technical knowledge, and most importantly, it’s free and easier to create.
Even, in just 10-15 minutes, you can create an XML sitemap and submit it to Google.
So, in this article, we will first explain what is an XML sitemap, why do you need a sitemap, and then show you how to create an XML sitemap and submit it to Google. Let’s get started.
What is an XML sitemap?
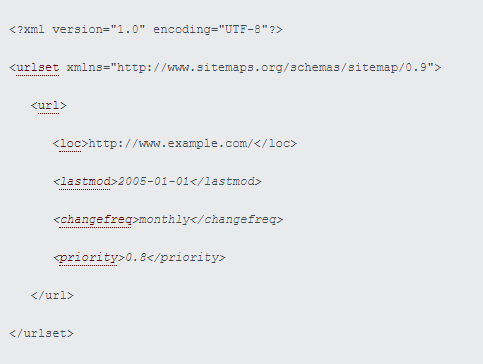
A sitemap is a list of a website’s URLs. It’s a roadmap of a website that tells Google what information is available and where to find it. A sitemap contains important information about each URL, such as – when a post or page was last updated, how often do you change, etc.
The best part of a sitemap is that you can specify what pages, posts, or media files to be indexed by search engines crawlers.
Sitemaps are specially written for search engines, not for humans. So, it would be hard for us to understand if not seen before.
Here’s how an XML sitemap looks:
Source
Why do you need a sitemap?
Search engines use crawlers to find and index all the information on the web. While crawling a page, they use both internal and external links to discover new content.
However, if a new webpage hasn’t linked from other known pages, crawlers find it difficult to discover new pages on a website, and as a result, the indexing process gets delayed.
That’s where a sitemap comes.
A sitemap doesn’t only contain a bunch of valuable links but also helps Search Engine crawlers to discover new information faster.
Once you submit your XML sitemap file to Google, you can see that all new posts/pages you are publishing are available somewhere on Google search results (after a couple of minutes). It’s because of the sitemap file.
When do you need to use a sitemap?
Not everyone needs a sitemap. Google has its own complex algorithm to schedule crawling.
Google officially stated when a webmaster needs a sitemap:
- Your website is really large
- Your website is brand new and has few external links pointing to it
- You don’t build internal links
However, in most cases, having a sitemap could be beneficial in a few ways.
Now I know the basics of a sitemap, let’s see how to create an XML sitemap and submit it to Google.
How to create an XML sitemap
Creating a sitemap is very simple. You can use an online tool to generate an XML sitemap and for WordPress sites, there are plenty of plugins available.
I will show both of them.
1. Creating a sitemap in WordPress
More than 35% of the total websites are powered by WordPress.
If you run a WordPress site, you can create a sitemap using a plugin.
There are several WordPress plugins available that allow you to create an XML sitemap, such as Yoast SEO, Rank Math SEO, etc.
Method 1, Create a sitemap using Yoast SEO
Yoast is one of the best SEO plugins for WordPress. Yoast plugin helps you to optimize your page titles, meta descriptions, SEO analysis, etc.
It also has an option to create an XML sitemap.
If you are not using the Yoast SEO plugin, download and install it from the WordPress plugin directory.
Follow the steps below
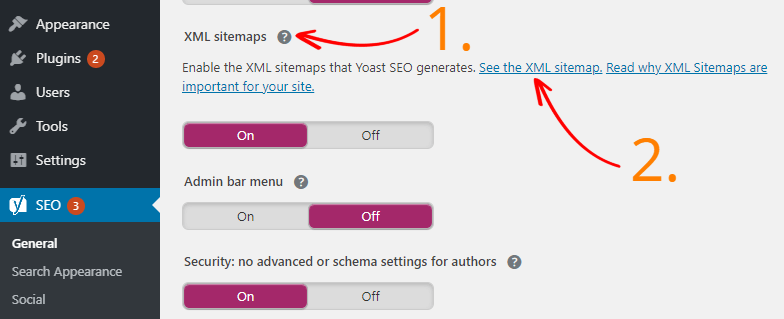
From your WordPress admin panel, go to Plugins > Add New and search for “Yoast SEO”.

Once activated, go to SEO > General > Features. Click on the Question icon to reveal the sitemap URL.
Method two – Creating a sitemap using Rank Math SEO
If you are using the Rankmath SEO plugin, you can generate a sitemap like the way you created using the Yoast SEO plugin.
But, I prefer using the Rank Math plugin because it gives more advanced options that are missing in Yoast SEO.
First, log in to your WordPress dashboard and go to Plugins > Add New.
Search for “Rank Math” and install it.

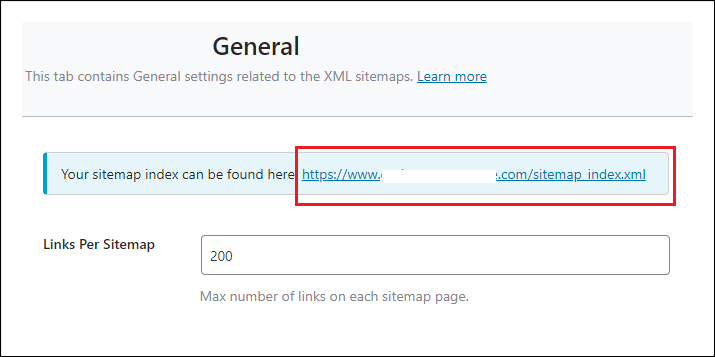
Upon activation, go to Rank Math > sitemap Settings.
From there, you can set how many links you want per sitemap page, exclude URLs, images in posts, etc.
At the top, you can see your sitemap URL which looks like:
“https://www.website.com/sitemap_index.xml”
Now, you are ready to submit to Google Search Console.
2. Creating a sitemap without a CMS
If you are not using any CMS, you can still generate a sitemap.
For this case, Screaming Frog would be a great option. Screaming Frog is a desktop-based program (available on Windows & Mac) that crawls your website. The software comes both in free and premium versions.
If your site has less than 500 URLs, you can start using the free version of Screaming Frog to generate a sitemap.
Follow the steps given below
Once downloaded and installed, open the software on your computer.
At the top of the screen, enter your website URL and click on Start.
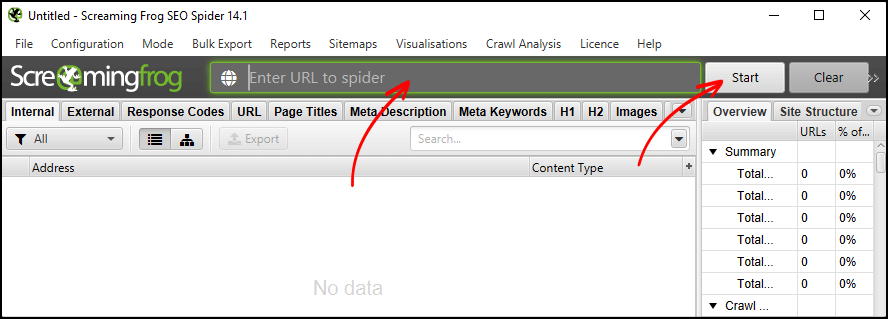
It will start crawling your site and may take a few minutes to finish.
Once the crawl is finished, take a look at what pages are being crawled.
If the number is below 500, then you are good to go.
From the top of the menu section, click on sitemap > XML sitemaps.

You can also include or exclude any options that you want in your sitemap file, such as Noindex pages, last modified date, Paginated URLs, PDFs, Images, etc.
I recommend keeping this default, however, you are free to make any modifications.
Once done, hit on the Export button and save the file on your computer.
Your XML sitemap file is ready to use.
3. Creating a sitemap in Wix
If you are using Wix, then you don’t need to manually create a sitemap.
Wix does it automatically.
You can view your sitemap file by going to “your-wix-site.com/sitemap.xml”.
However, in Wix, you wouldn’t have much control over your sitemap.
If you want to exclude a page from the sitemap, simply go to the “SEO (Google)” settings tab under page settings and turn off “Show this page in search results”.
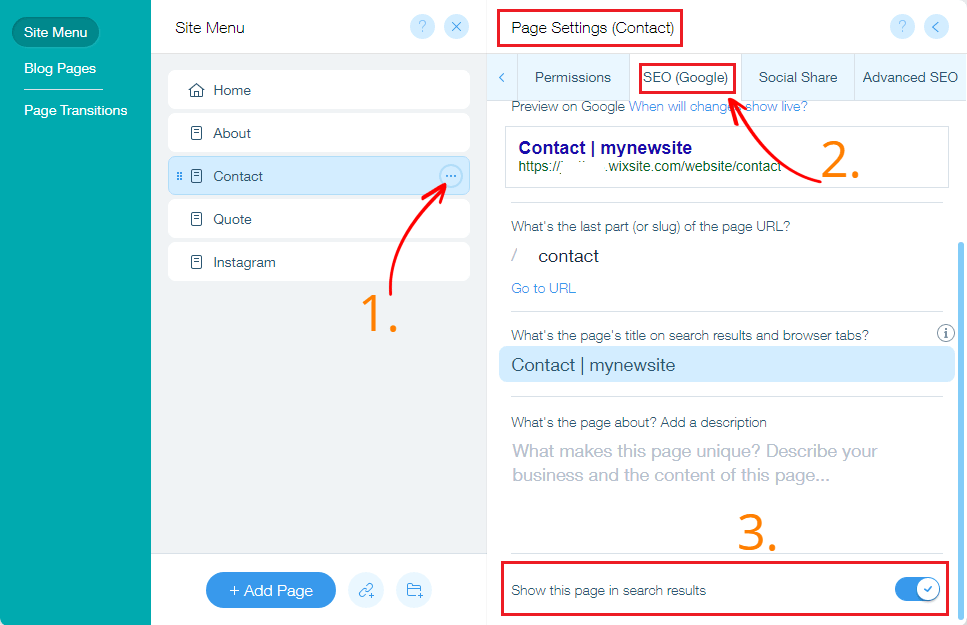
Note: Wix recommends that you submit your sitemap each time you make any changes.
4. Creating a sitemap in Squarespace
Like Wix, Squarespace also creates a sitemap automatically.
You can view your sitemap by adding “/sitemap.xml” at the end of your website’s URL, which is “your-website.com/sitemap.xml”.
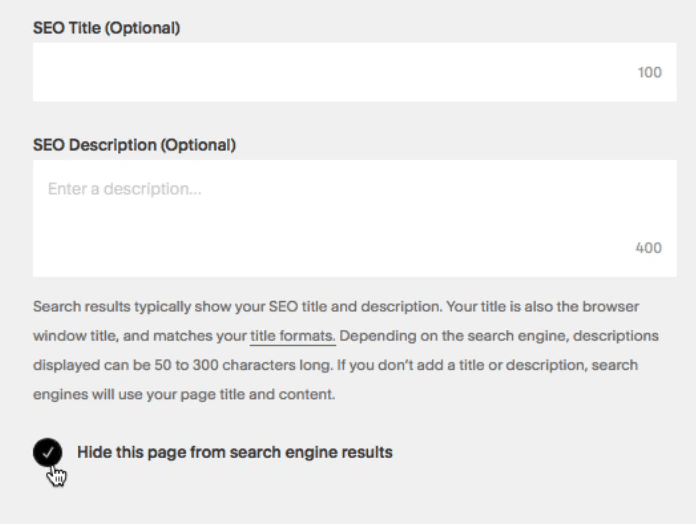
You can’t manually edit your sitemap in Squarespace, however, you can exclude pages from search results.
To perform this, go to Page setting and check “Hide this page from search engine results” in the SEO tab.
5. Creating a sitemap in Shopify
Shopify automatically generates an XML sitemap file for you. You can view your sitemap file by going to “your-website.com/sitemap.xml”.
The generated sitemap contains all the products, collections, blogs, and webpages. The sitemap files automatically updated when made any changes.
Now your sitemap file is ready for submission.
Suggested read – How to optimize your Shopify site for SEO
How to submit an XML sitemap to Google
Now you have just created an XML sitemap file, it’s time for submitting to Google.
For this, you will need to connect your Google Search Console account with your website. Here’s the step by step procedure by Google.
Once connected, log in to your Google Search Console account and select your website.
From the dashboard, click on the sitemaps.
You will see the option “Add a new sitemap”. Enter your sitemap URL in the blank field, and hit the Submit button.
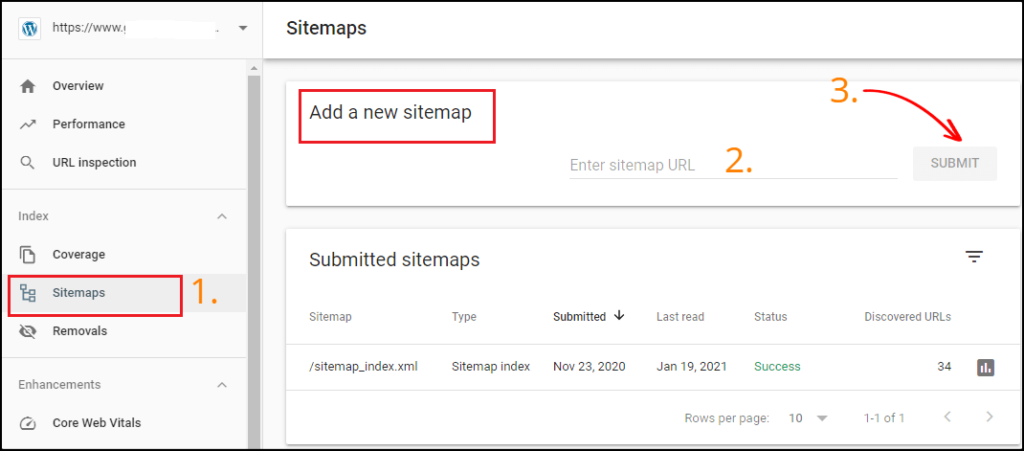
That’s it. Now, sit back and relax. Google will take care of the rest.
Fixing your sitemap errors to improve SEO
Generally, if your site consists of one or more technical errors, it’s really hard to figure it out. However, in most cases, it’s not even detectable unless you use a paid site auditor tool.
But, there is good news for you.
If you have submitted your sitemap to Google, you can see detailed index coverage reports to check if there is any technical error present on your site.
Log in to your Google Search Console account, and click on Coverage.
Then click on the Error, Valid with a warning, Valid, and Excluded tab to get the details.

From there, you can check pages for:
- Indexed but blocked by robots.txt
- Pages that have a server error (5xx)
- Excluded by ‘noindex’ tag
- Crawled but not indexed
- Not found (404)
- Page with redirect
- Blocked by robots.txt, and many more
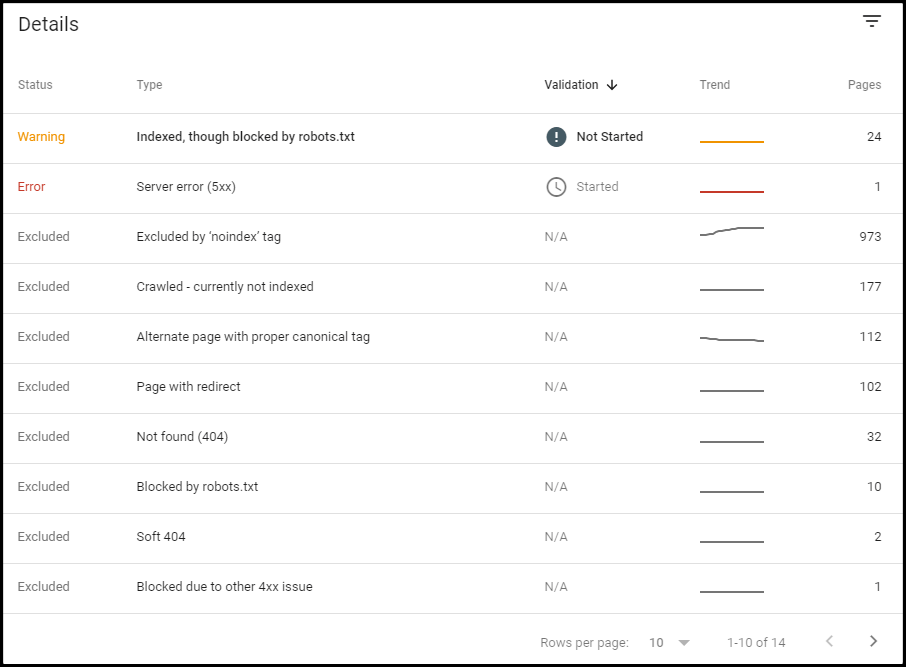
Click on each of the error pages to check what you need to fix. Once done, you can request Google to mark it as fixed by clicking on Validate Fix.

Once you fix all the technical errors with the help of your XML sitemap file, you can see a significant improvement in your search traffic.
Conclusion
Creating an XML sitemap is very simple and doesn’t require any technical skills. If you are using WordPress, you can create a sitemap using SEO plugins in just a few clicks. It’s also easier if you are not using any CMS.
There is no evidence that a sitemap boosts your website’s SEO, but it helps Google to find and index your website’s content faster. I also recommend you use a sitemap.
Submitting a sitemap to Google is just a tiny part of the full SEO game.
Jyoti Ray is the Founder of WPMyWeb.com. He writes about blogging, WordPress tutorials, hosting, and affiliate marketing.
The post How to create an XML sitemap and submit it to Google appeared first on Search Engine Watch.


