Visit our website: https://www.nicepage.com
Read more at https://nicepage.com/doc/article/1318/video-tutorials
Subscribe to find more information:
https://youtube.com/nicepage
https://facebook.com/nicepageapp
This demo explains how to Install the WordPress Theme and WordPress Plugin. Since the export is supported only in the desktop versions, we will use Nicepage for Windows for this demonstration.
Add a Website
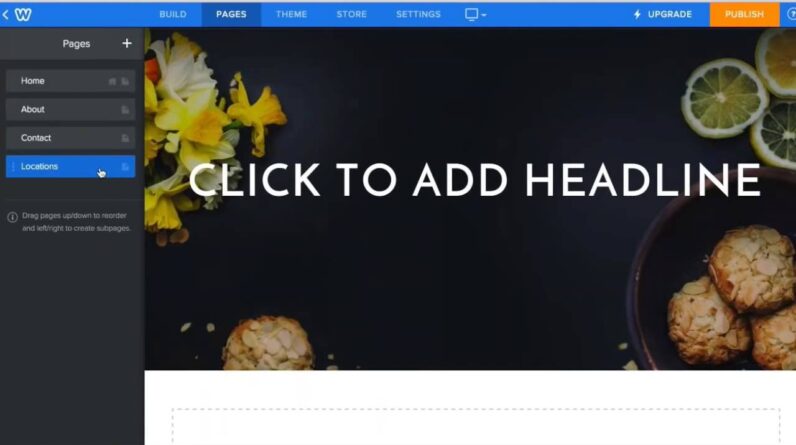
Run Nicepage for Windows. Add a new website. Select one of the pre-designed examples, for example, this one. Once you have created the website, Nicepage automatically opens the first page for editing.
A WordPress theme typically has the Blog and Post templates. Therefore, we will select a style for the Blog template to demonstrate the Theme export. Select Theme – Blog Template. Select a style. Click Done.
Export Options
Let’s export. Note, there are three Export options available for WordPress. The first option is for exporting only the Nicepage Theme without the content. In the Export dialog enter the zip name and select the “Theme” option. Click the Export button.
The second option is for exporting only the Content created in Nicepage which will also include the Nicepage WordPress Plugin . Note that this option does not include the Theme. Therefore, it should be used only if the Nicepage Theme was installed before. In the Export dialog enter the zip name and select the “Content” option. Click the Export button.
Finally, the third option is used to export both the Theme and the Content in one package. In the Export dialog enter the zip name and select the “Theme and Content” option. Click the Export button.
Installing the WordPress Theme, Pages and Plugin
Since the “Theme and Content” export is the most commonly used combination, we will start with this option. Switch to your WordPress Admin. Select Appearance – Themes. Click Add New. Click Upload Theme. Choose the zip file from your local export folder. Click “Install Now”. Click “Activate”.
Start the WordPress Plugin installation. Click the “Begin installing plugin” link, recommended for the Nicepage Theme. In the “Install Required Plugins” screen, click the Install link. Once the WordPress Plugin is installed successfully, return to the dashboard.
You should see the notification asking if you want to import the Content. Click the “Import content” button. Switch to Pages. Click Pages – All Pages in the WordPress Panel to the left. Click the “Home” page link to open the Home page.
Select the Nicepage Template with the header and the footer in the “Template” drop-down list. Click the Update button.
Click the “Edit with Nicepage” button to start the Content Editor inside your WordPress site. You should see the same editor and the page created in the Nicepage for Windows application.
Preview the Page in the Nicepage WordPress Plugin. Click Preview. Also click the Visit site link in the WordPress menu.
Installing the WordPress Theme Only
Now we are proceeding to other two options. We will install the WordPress Theme without the Content. Go back to the WordPress dashboard. Note we have reverted the previous installation. Select Appearance – Themes. Click Add New. Click Upload Theme. Select the zip from you local export folder. Click Install Now. Click Activate. The theme is installed.
Click the Visit Site link in the WordPress menu to preview. You see the Blog set by default for your WordPress site. And it uses the style selected in the Nicepage for Windows application.
Install the Content. Note this option is used only if the Theme was previously installed. As a reminder the zip contains both the content and the WordPress Plugin. First we will install the Plugin. Go to Plugins – Add New. Click the “Upload Plugin” button. Select the zip from your local export folder. Click the “Install Now” button. Click the “Activate Plugin” button.
Now import the content. Select Nicepage – Import in the WordPress menu. Select the same zip from your local export folder. You may want to remove the previously installed content. Finally, click the “Upload file and import” button.Select Pages. Open the Home page. Select the Nicepage template with the header and the footer in the Template drop-down menu. Click Update.
Preview the page. You see that the page does not have a menu. Close the Nicepage preview.
Adding a WordPress Page to the Menu
Let’s Add a menu. Select Appearance – Menus. Select the Primary Navigation position for the menu. Add the Home page to the menu. Click the Save Menu button.
Select Pages – All Pages. Select the Home page. Click the “Edit with Nicepage” button. Click the Preview. You see, now there is a menu from the Theme.
Nicepage Builder saves newly created pages as Drafts. To make the page public you should Publish it, or change it status to ‘Published’.
Preview the WordPress site. Click the “Visit Site” link. You see the Blog displayed by default. Click the menu. Select the Home page.