HTML links (also called hyperlinks) are some of the most important functions of the internet. Google literally relies on them to find, crawl, index, and rank pages.
Links have a lot of power, both in terms of user experience and your site’s SEO.
So, understanding how to code HTML links properly is key if you want to create links that help (not hinder) your website’s performance.
The Components of an HTML Link
You create an HTML link using the anchor element: .
You then use attributes and values to change how the link functions.
Here’s what the complete HTML code for a clickable link looks like:
<a href="https://example.com" target="_blank" rel="noopener">Visit Example.com for more info.</a>
Let’s break that down:
- The anchor tag (<a>) is the foundation of every link. It tells browsers “this is a clickable link.”
- The href attribute defines where your link goes. This can be a web address, a file path, or even a specific section on the current page.
- The target attribute controls how the link opens. The default is to open in the same window, but _blank makes it open in a new tab.
- The rel attribute defines the relationship between the linking page and the linked page. It’s particularly important for SEO (more on that in the best practices section).
- The anchor text is what users see and click. In the example above, it’s “Visit Example.com for more info.”
- The closing tag (<a>) indicates where the link ends.
I’ll talk more about the role these elements play later in this guide. For now, let’s look at some of the most common ways to add HTML links.
How to Add Links with HTML Code
The basic method of adding links with HTML code involves placing the URL you want to link to within a link anchor tag. Just like the example above.
But here are a few of the most common use cases for adding links in HTML:
Text Links
Text links are the most common type of hyperlink you’ll create. You can use them to link to other pages on your site (internal links) or on other sites (external links).
Here’s the standard implementation:
<a href="https://example.com">Visit our website</a>
This creates a basic text link that users can click to navigate to the specified URL.
You can enhance text links with additional attributes for specific use cases. For example, here’s how you would set a link to open in a new tab:
<a href="https://example.com" target="_blank" rel="noopener noreferrer">Visit Example.com</a>
If it’s an affiliate link, you might use something like this:
<a href="https://example.com" target="_blank" rel="noopener noreferrer sponsored">Visit Example.com</a>
(More on these attributes later.)
Image Links to Make Images Clickable
Images can serve as powerful, eye-catching links that often attract more attention than plain text.
The basic structure for an HTML image link wraps an <img> tag inside an anchor tag:
<a href="https://example.com">
  <img src="logo.png" alt="Company Logo">
</a>
This transforms the entire image into a clickable link that navigates to the specified URL.
The “img src” attribute specifies the location of the image file. While the “alt” attribute specifies alternative text for the image.

For image links to be accessible and SEO-friendly, you should include descriptive alt text. Like this:
<a href="/product/camera">
  <img src="camera.jpg" alt="Canon EOS R6 Mark II Camera">
</a>
The alt text serves two critical purposes:
- Screen readers will read it aloud for visually impaired users to understand the image’s content
- It helps search engines understand the content of your image (which may help you rank in image search results)
You should only make your images clickable if they actually take the user somewhere useful. Like to the image’s source website.
It’s worth noting that for image links and a few of the other types below, you might implement them in different ways.
For example, here’s how we implement some image links here on Backlinko (using CSS classes):
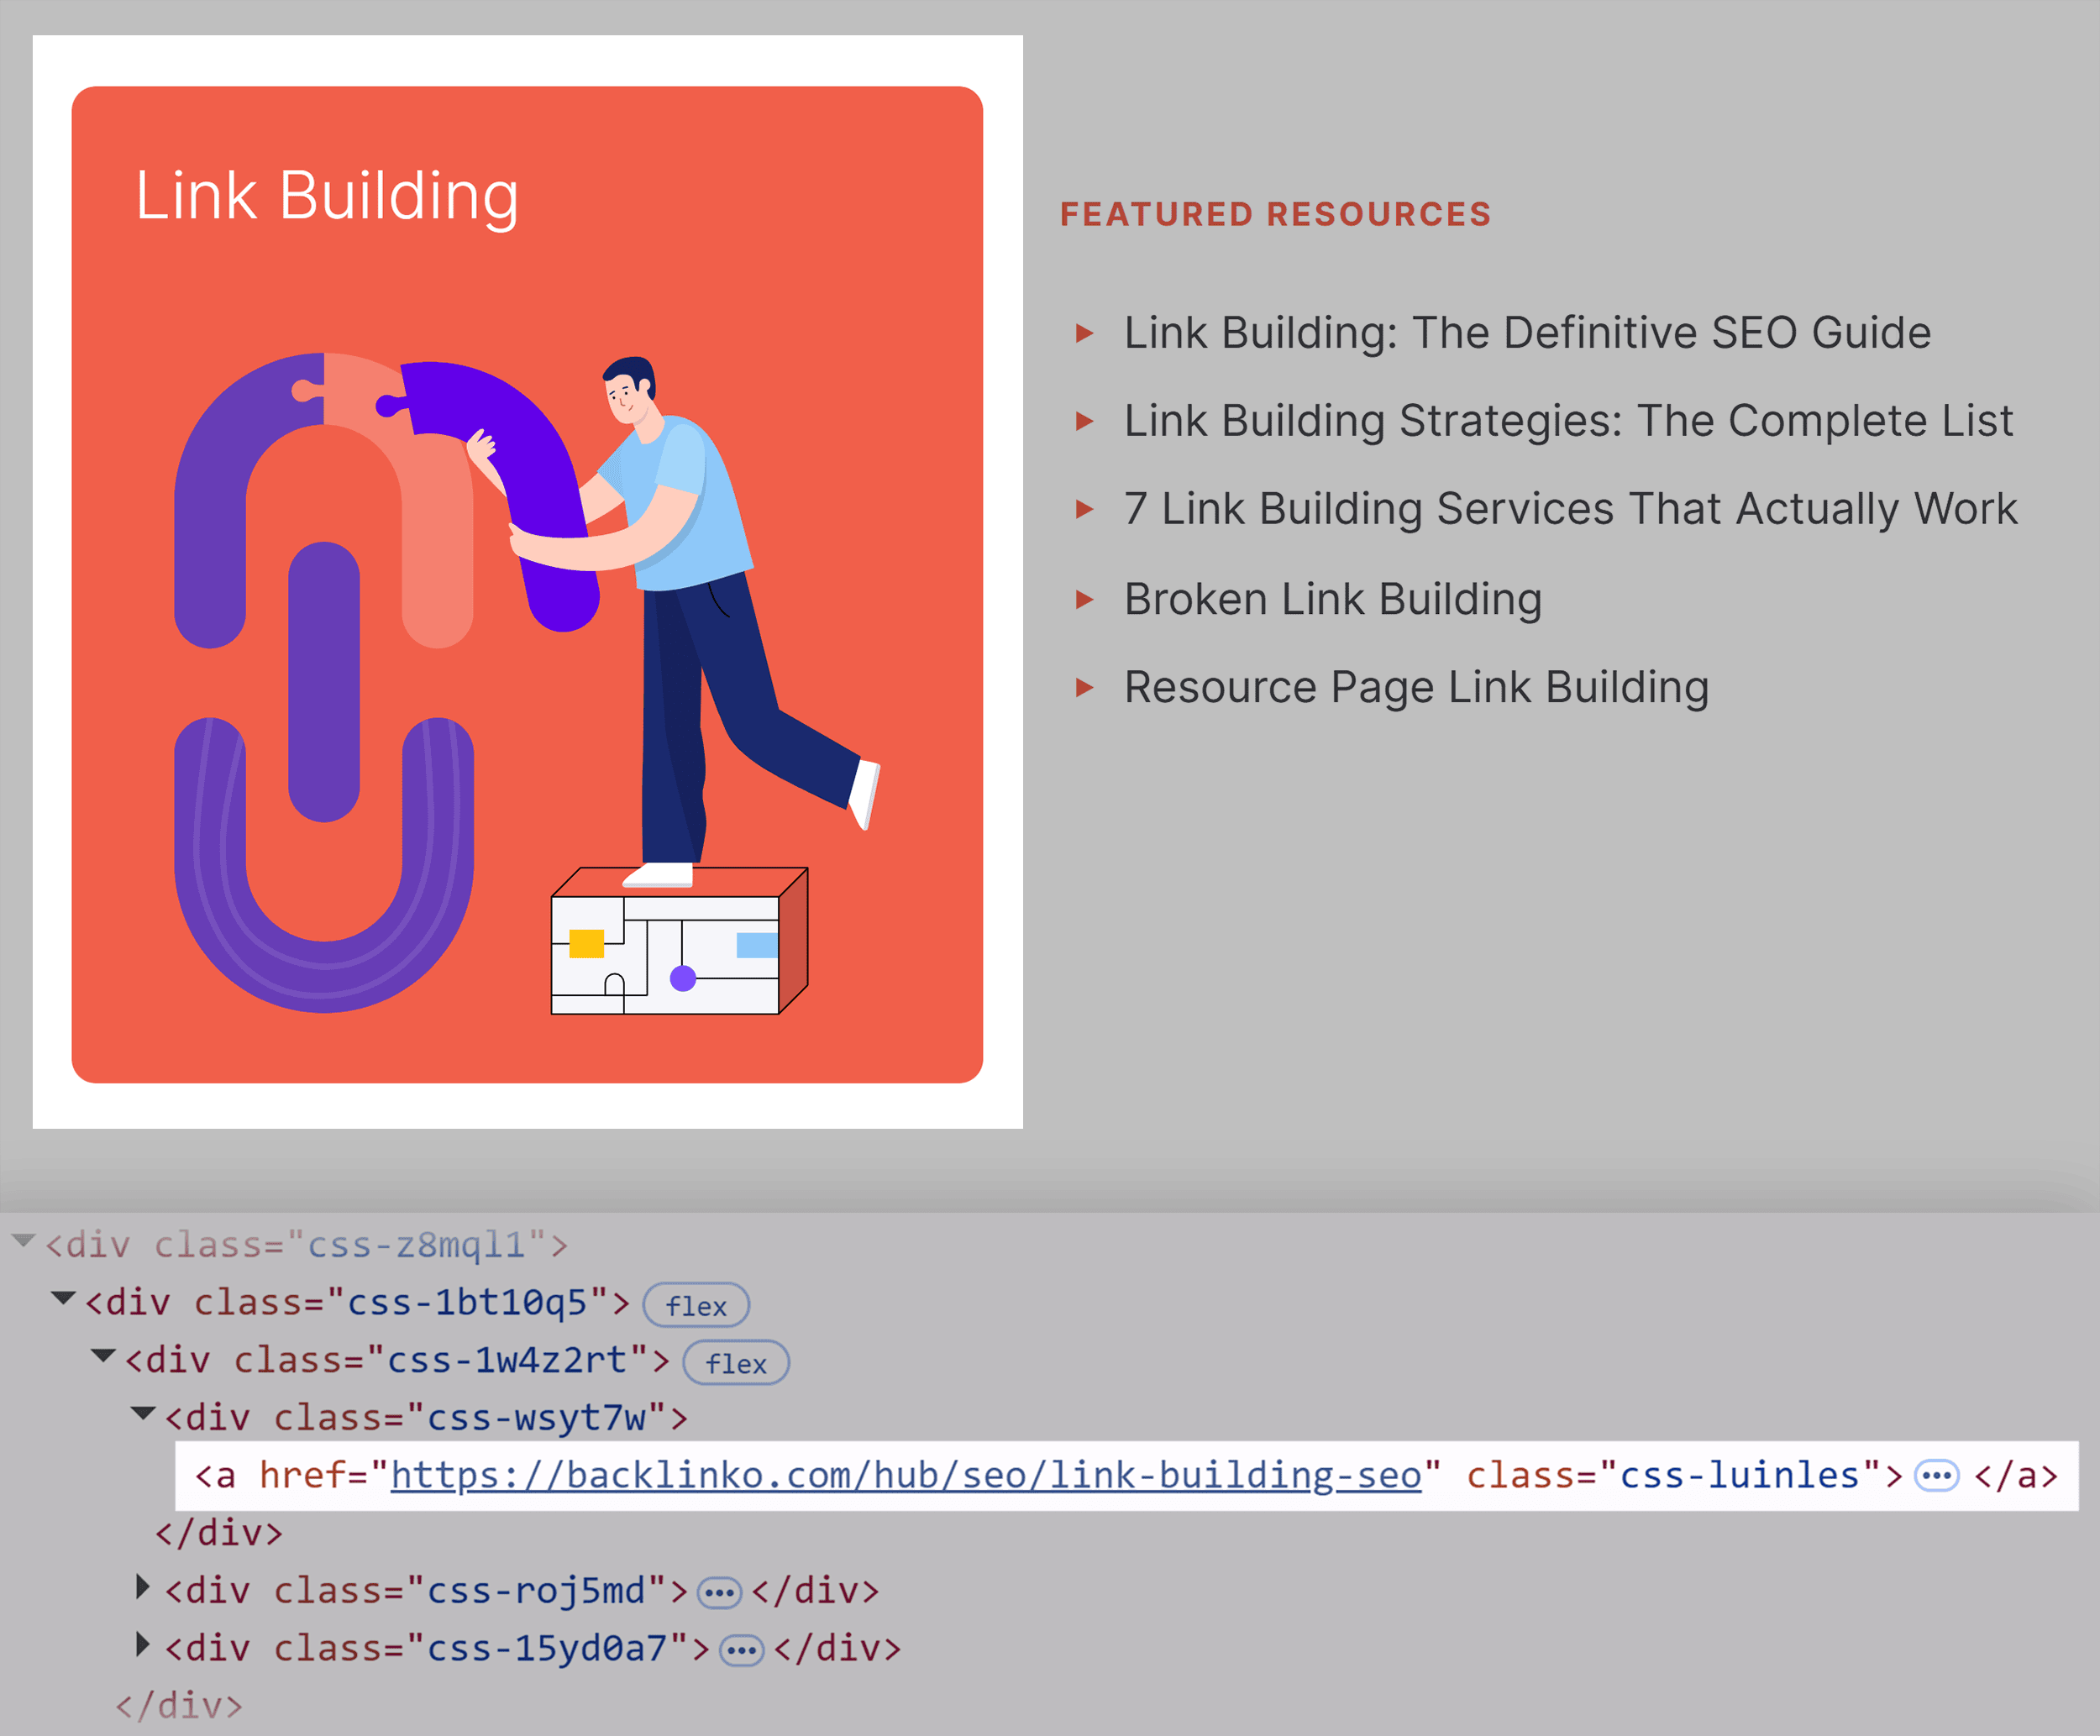
But here’s an image link on The Spruce:
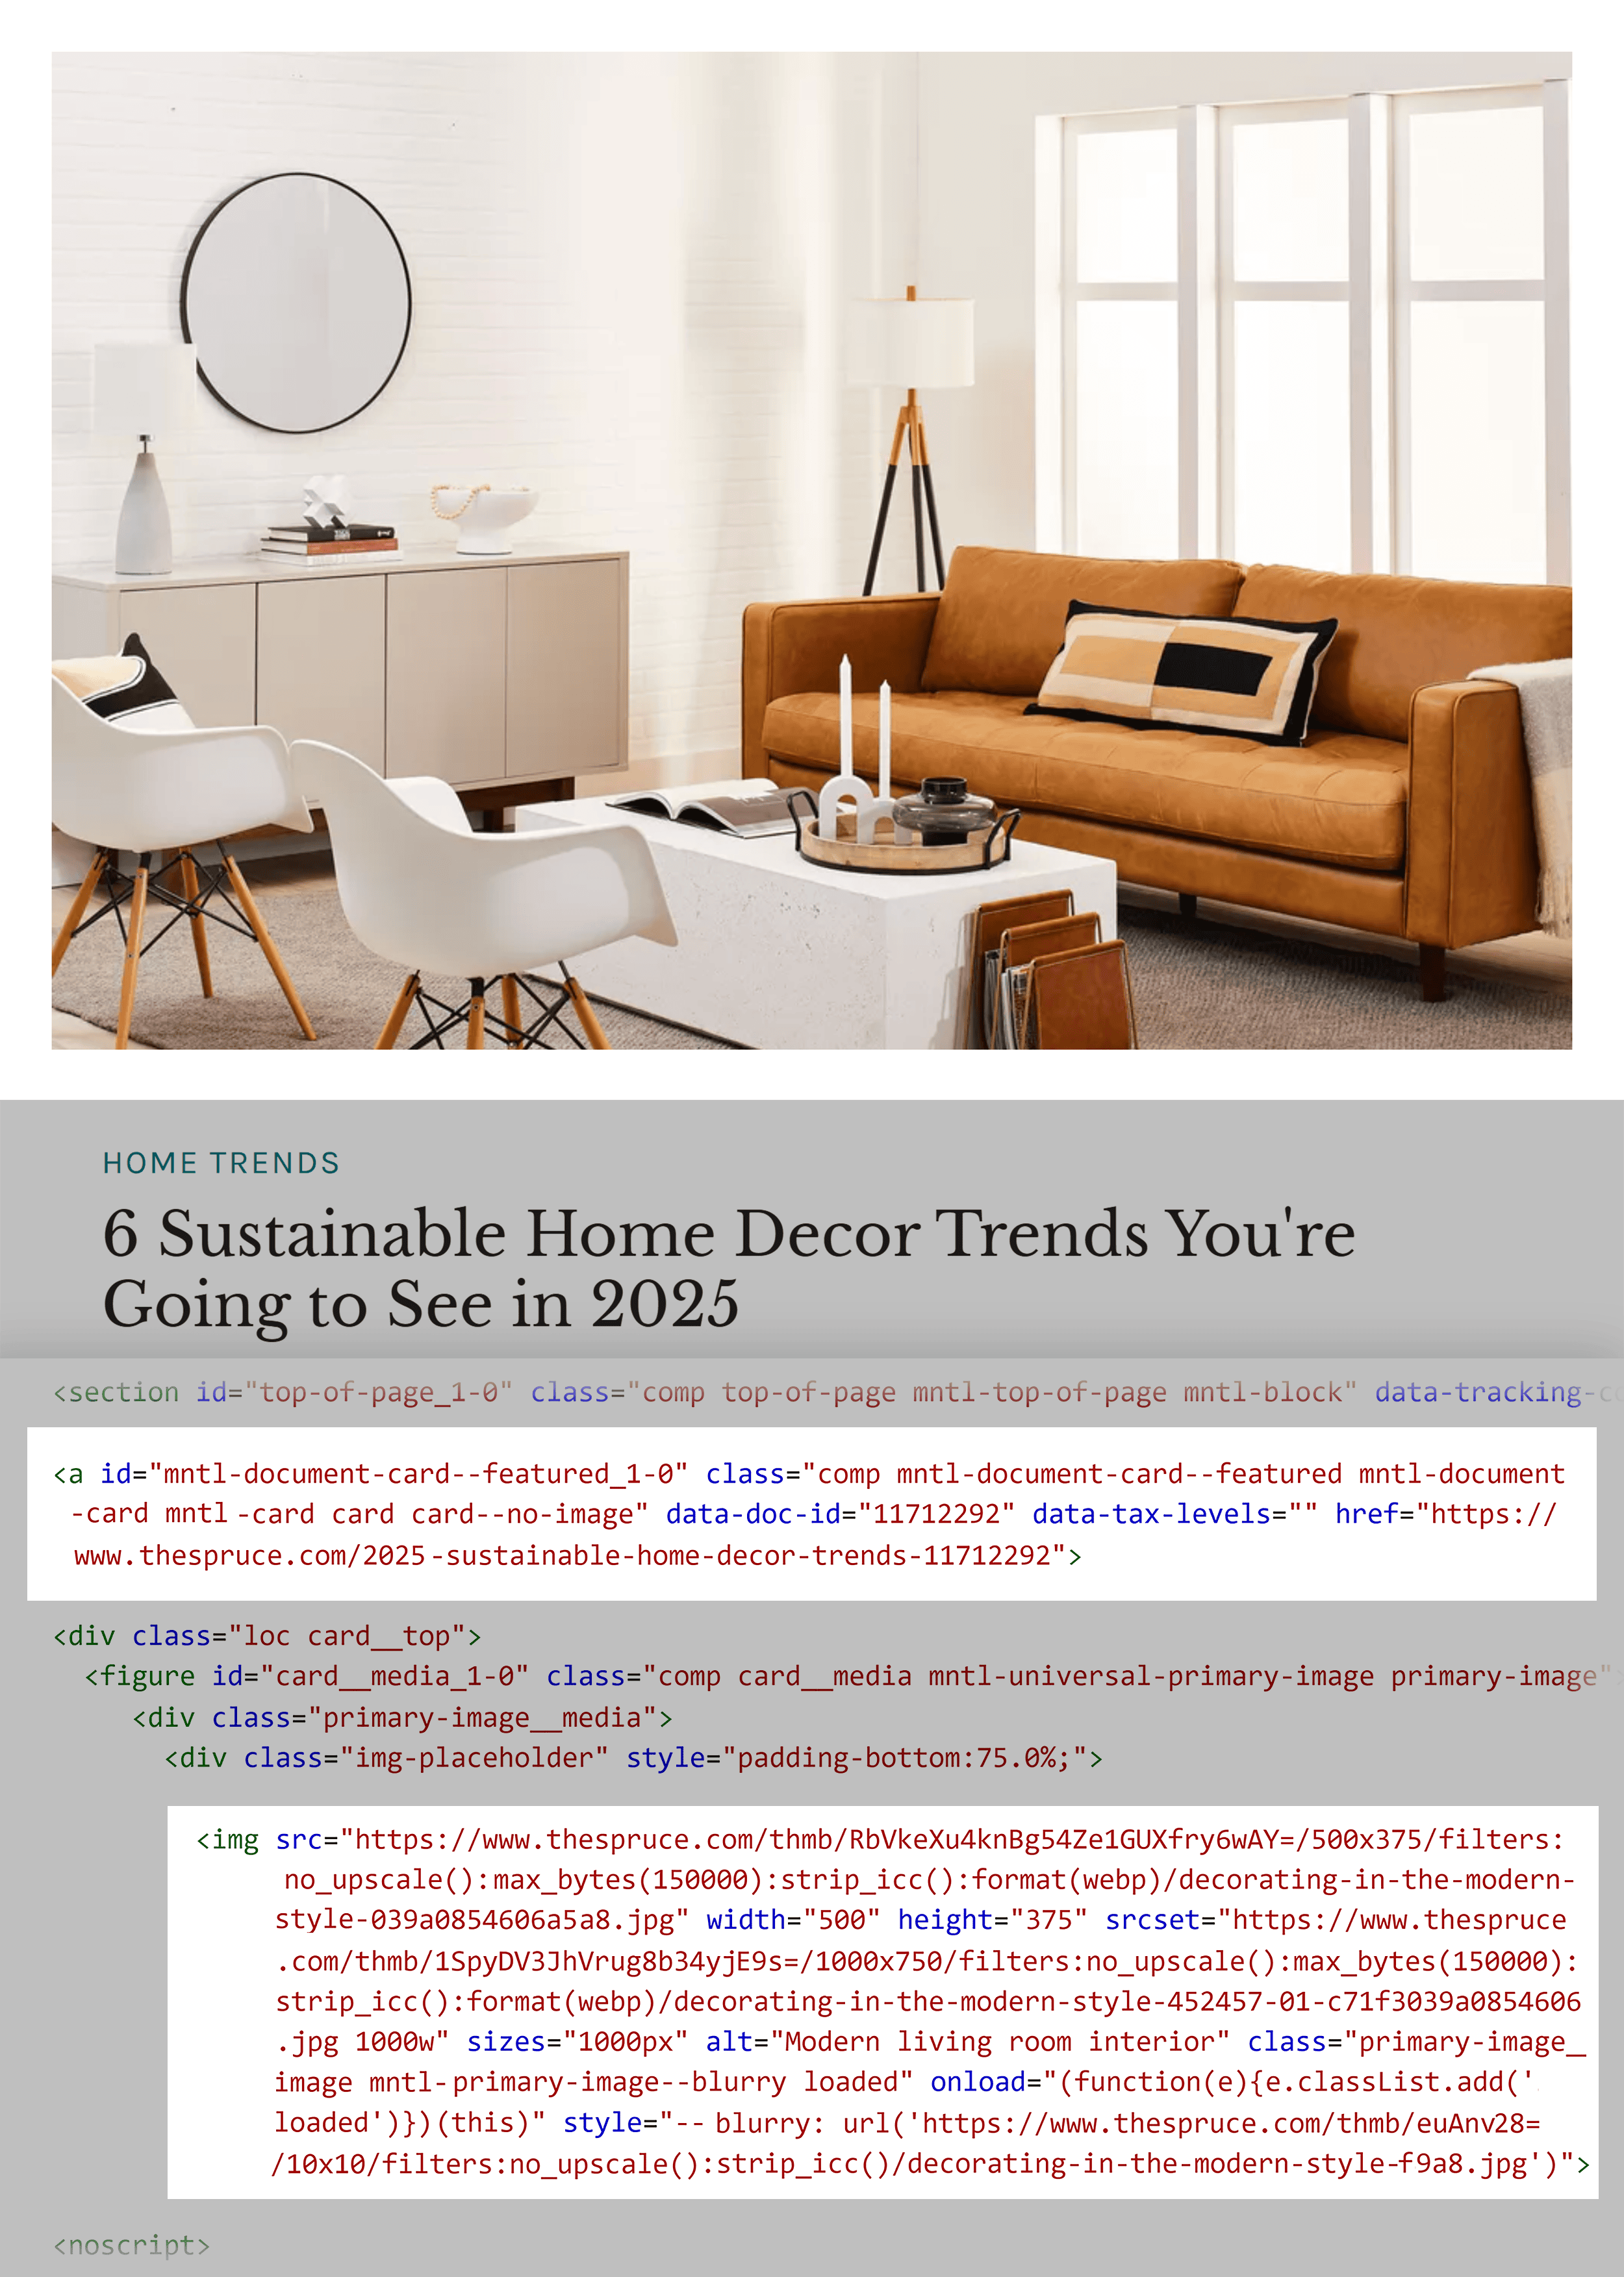
In this case, the image link is still contained within an <a> tag. But there are other elements (like <div>) and classes (like img-placeholder) as well.
How exactly you implement image links largely depends on your website setup. If you use WordPress, your theme and plugins will likely dictate how you code your image links.
Further reading: Image SEO: 15 Essential Optimization Tips
Email Links
Email links use a special protocol that launches the user’s default email client. They’re perfect for making it easier for users to reach you.
Use the mailto: protocol to create email links:
<a href="mailto:contact@example.com">Email Us</a>
When a user clicks this link, it opens their default email program with the recipient field already populated.
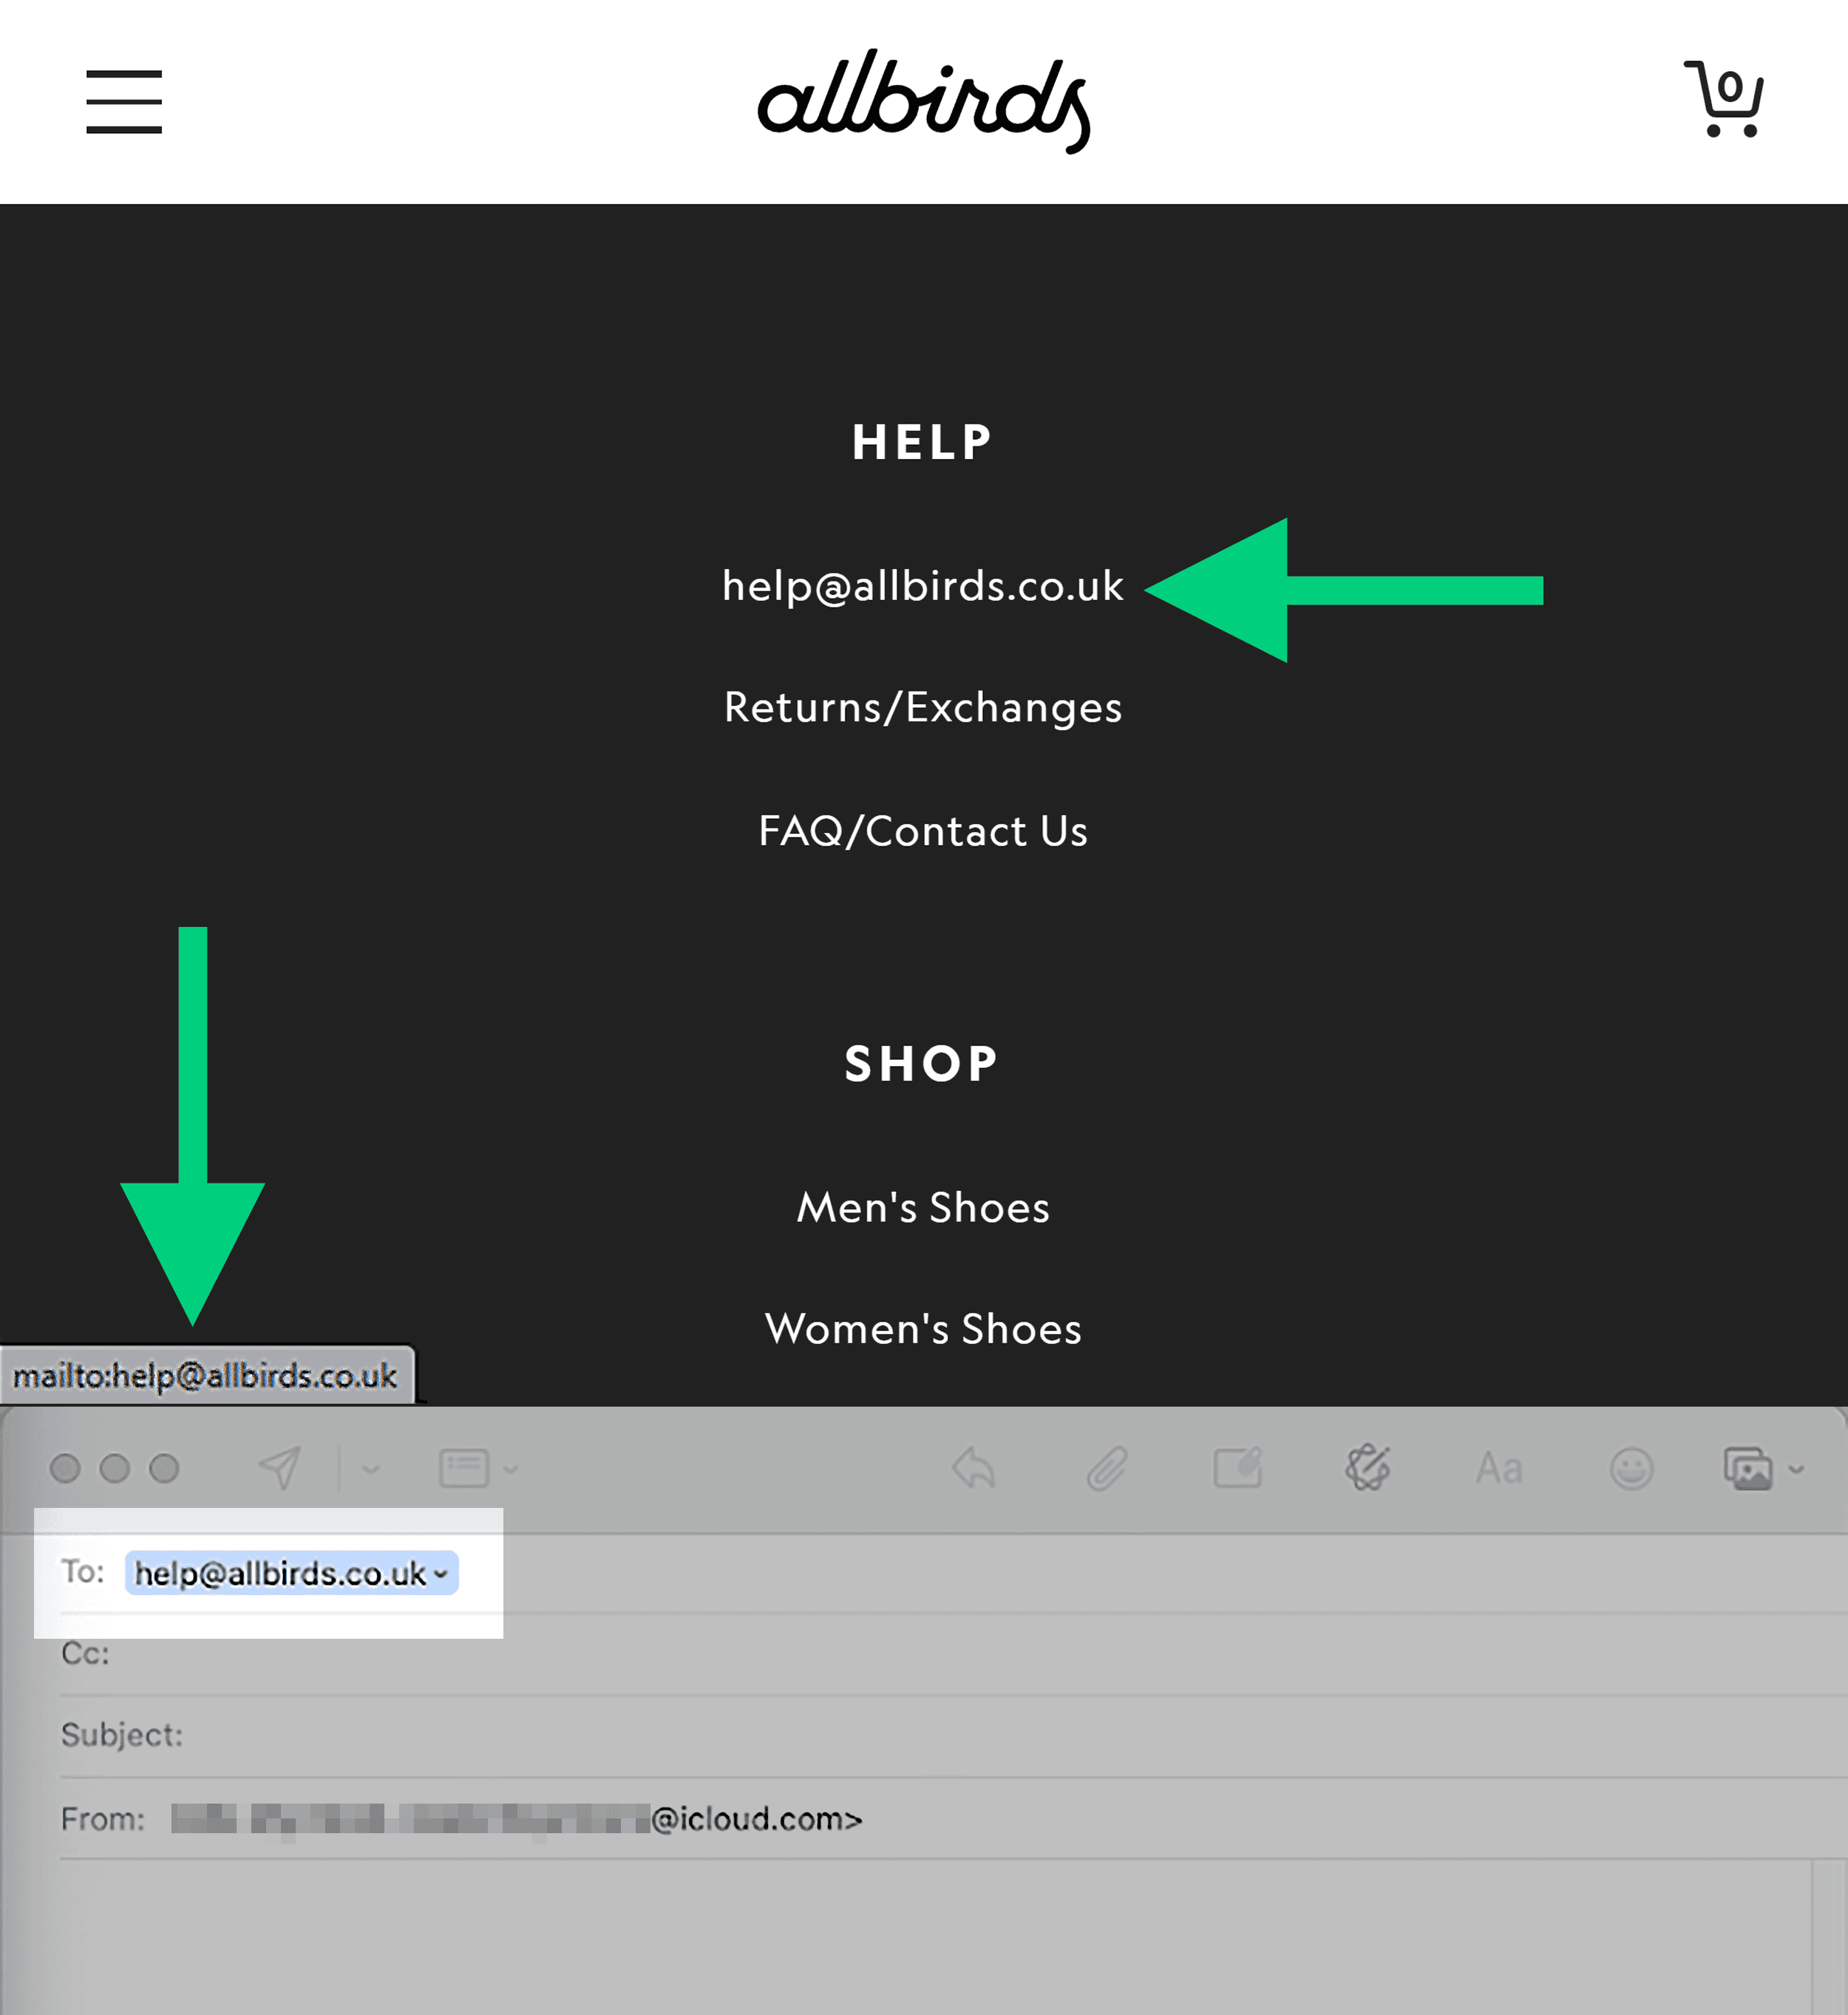
You can enhance email links with additional parameters too. Like this:
<a href="mailto:sales@example.com?subject=Product%20Inquiry&body=I%27m%20interested%20in%20learning%20more">Email Sales Team</a>
This pre-fills the subject line with “Product Inquiry” and adds initial text to the email body that says “I’m interested in learning more.”
(Note that you need to encode spaces and special characters, like %20 for a space.)
Pro tip: Make it clear what will happen when a user clicks the link with descriptive anchor text. This way, they won’t be confused when their email client opens.
Phone Links
For phone numbers, use the tel: protocol:
<a href="tel:+15555555555">Call (555) 555-5555</a>
When a user taps this link on their mobile device, it opens the phone dialer with the number ready to call.
For international phone numbers, always include the country code with a plus sign:
<a href="tel:+442071234567">Call our London office: +44 20 7123 4567</a>
You can also use the “sms” value to open up a text message:
<a href="sms:+442071234567">Send us a text</a>
As with email links, be clear in your anchor text for phone and SMS links about what will happen when the user taps the link.
Jump links, also known as anchor links, help users navigate to specific sections within the same page. They’re especially useful for long-form content.
If your site uses a table of contents (like this site does), it works using jump links in this way.

The basic structure requires two parts:
- An element with an id attribute that serves as the target
- A link that points to that id using a hash (#) symbol
For example, in our article on keyword mapping, which is a step-by-step list, we use jump links to make it easier for users to navigate.
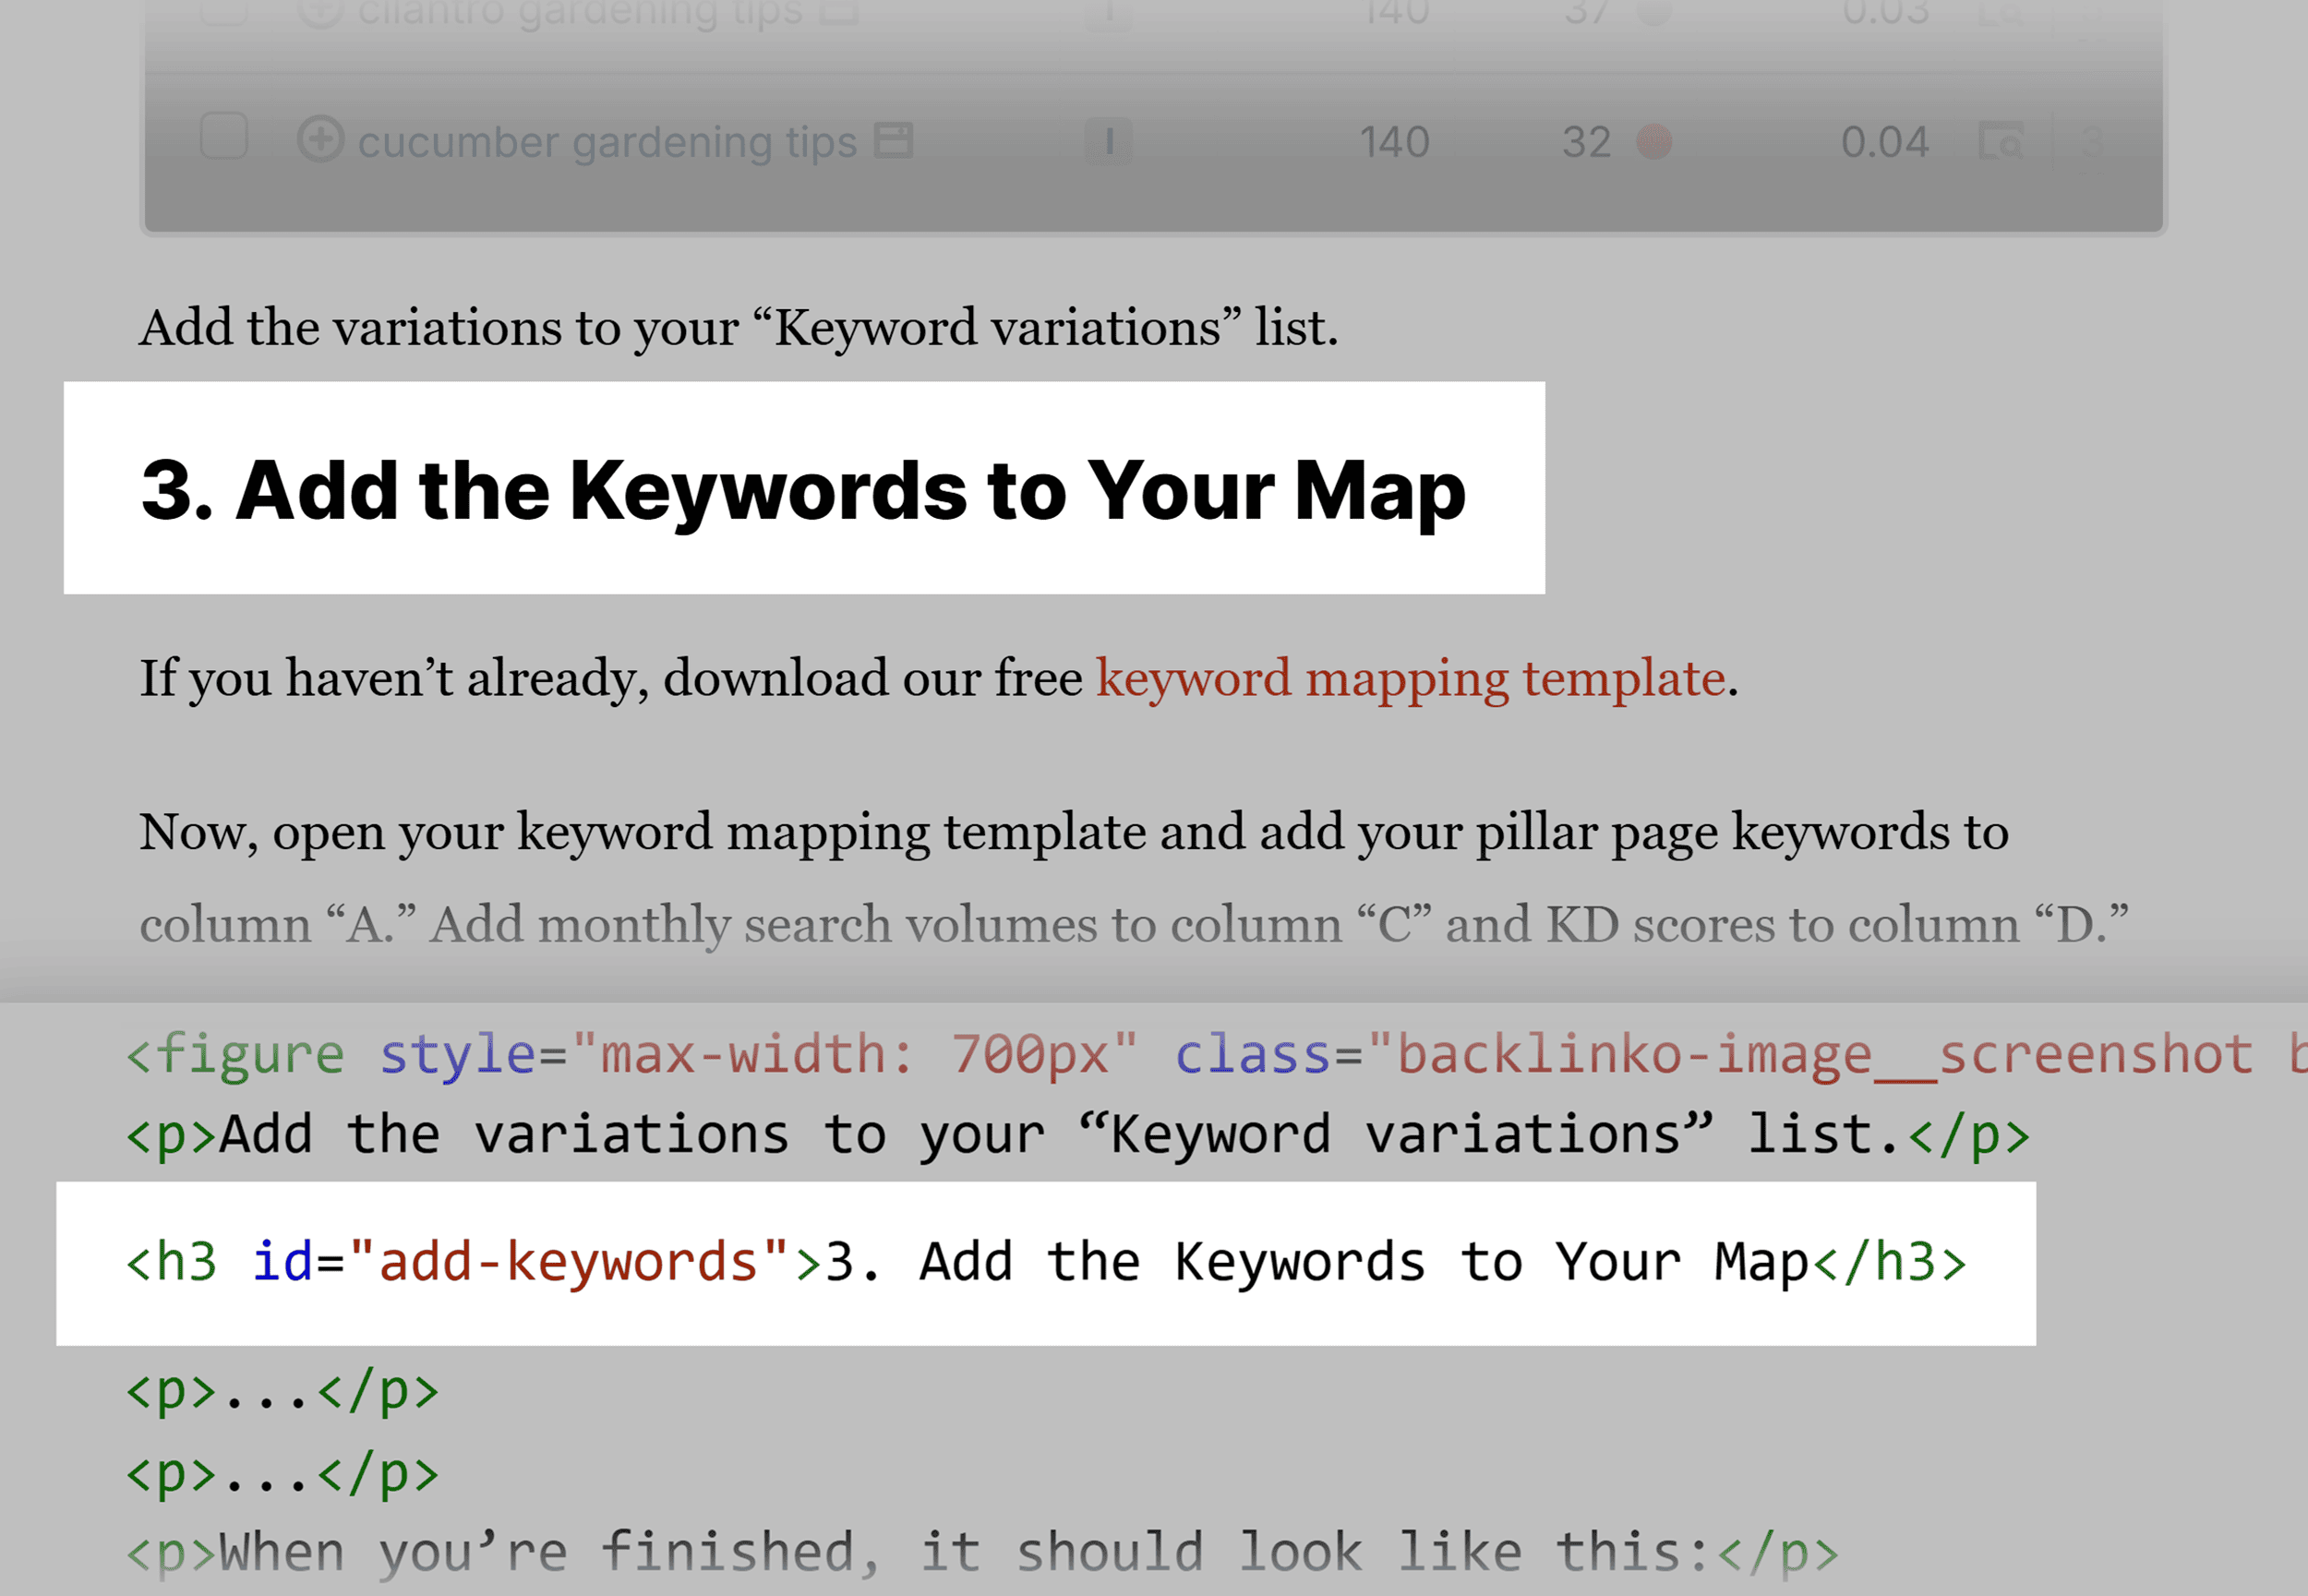
First, we added “id” tags to the headings, like this:
<h3 id="add-keywords">3. Add the Keywords to Your Map</h3>
You don’t see this id attribute on the page, but it’s in the site’s code:
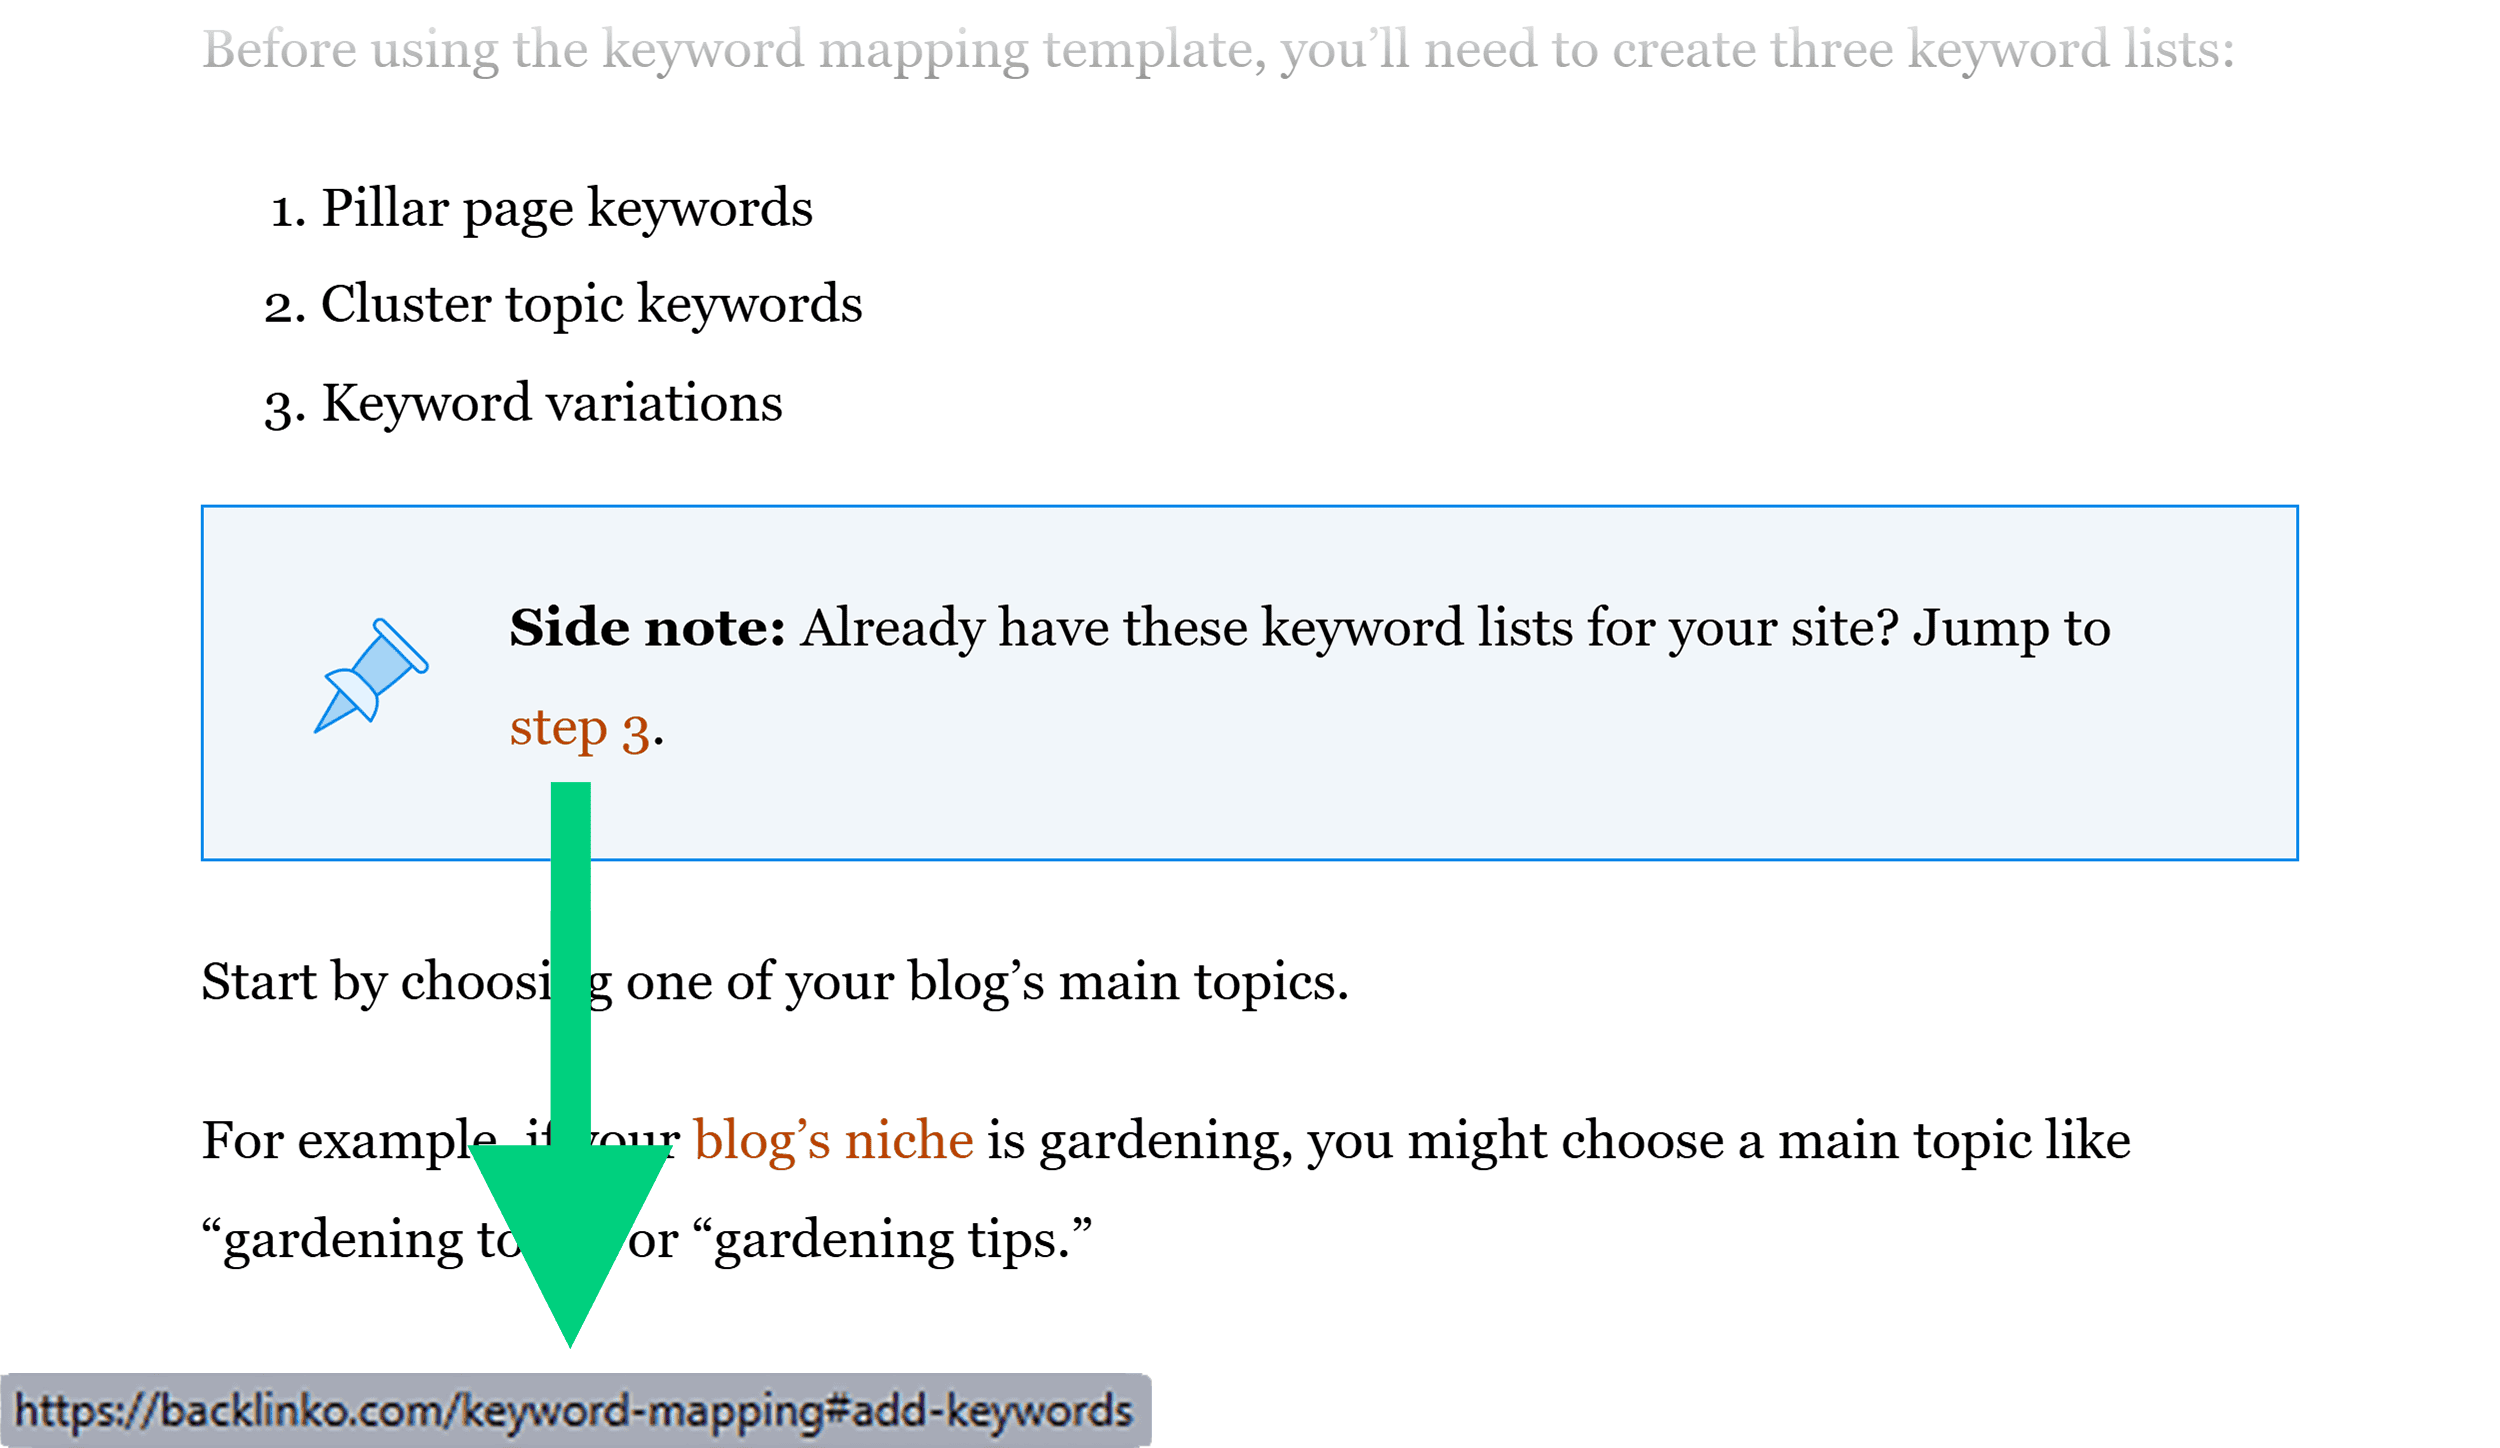
Then, in the second step of the list, which some users might not need to follow, we include a link to skip ahead to the third step (which has the id “add-keywords”).
The HTML link code looks like this:
<a href="#add-keywords">step 3</a>
And the link on the page looks like this:
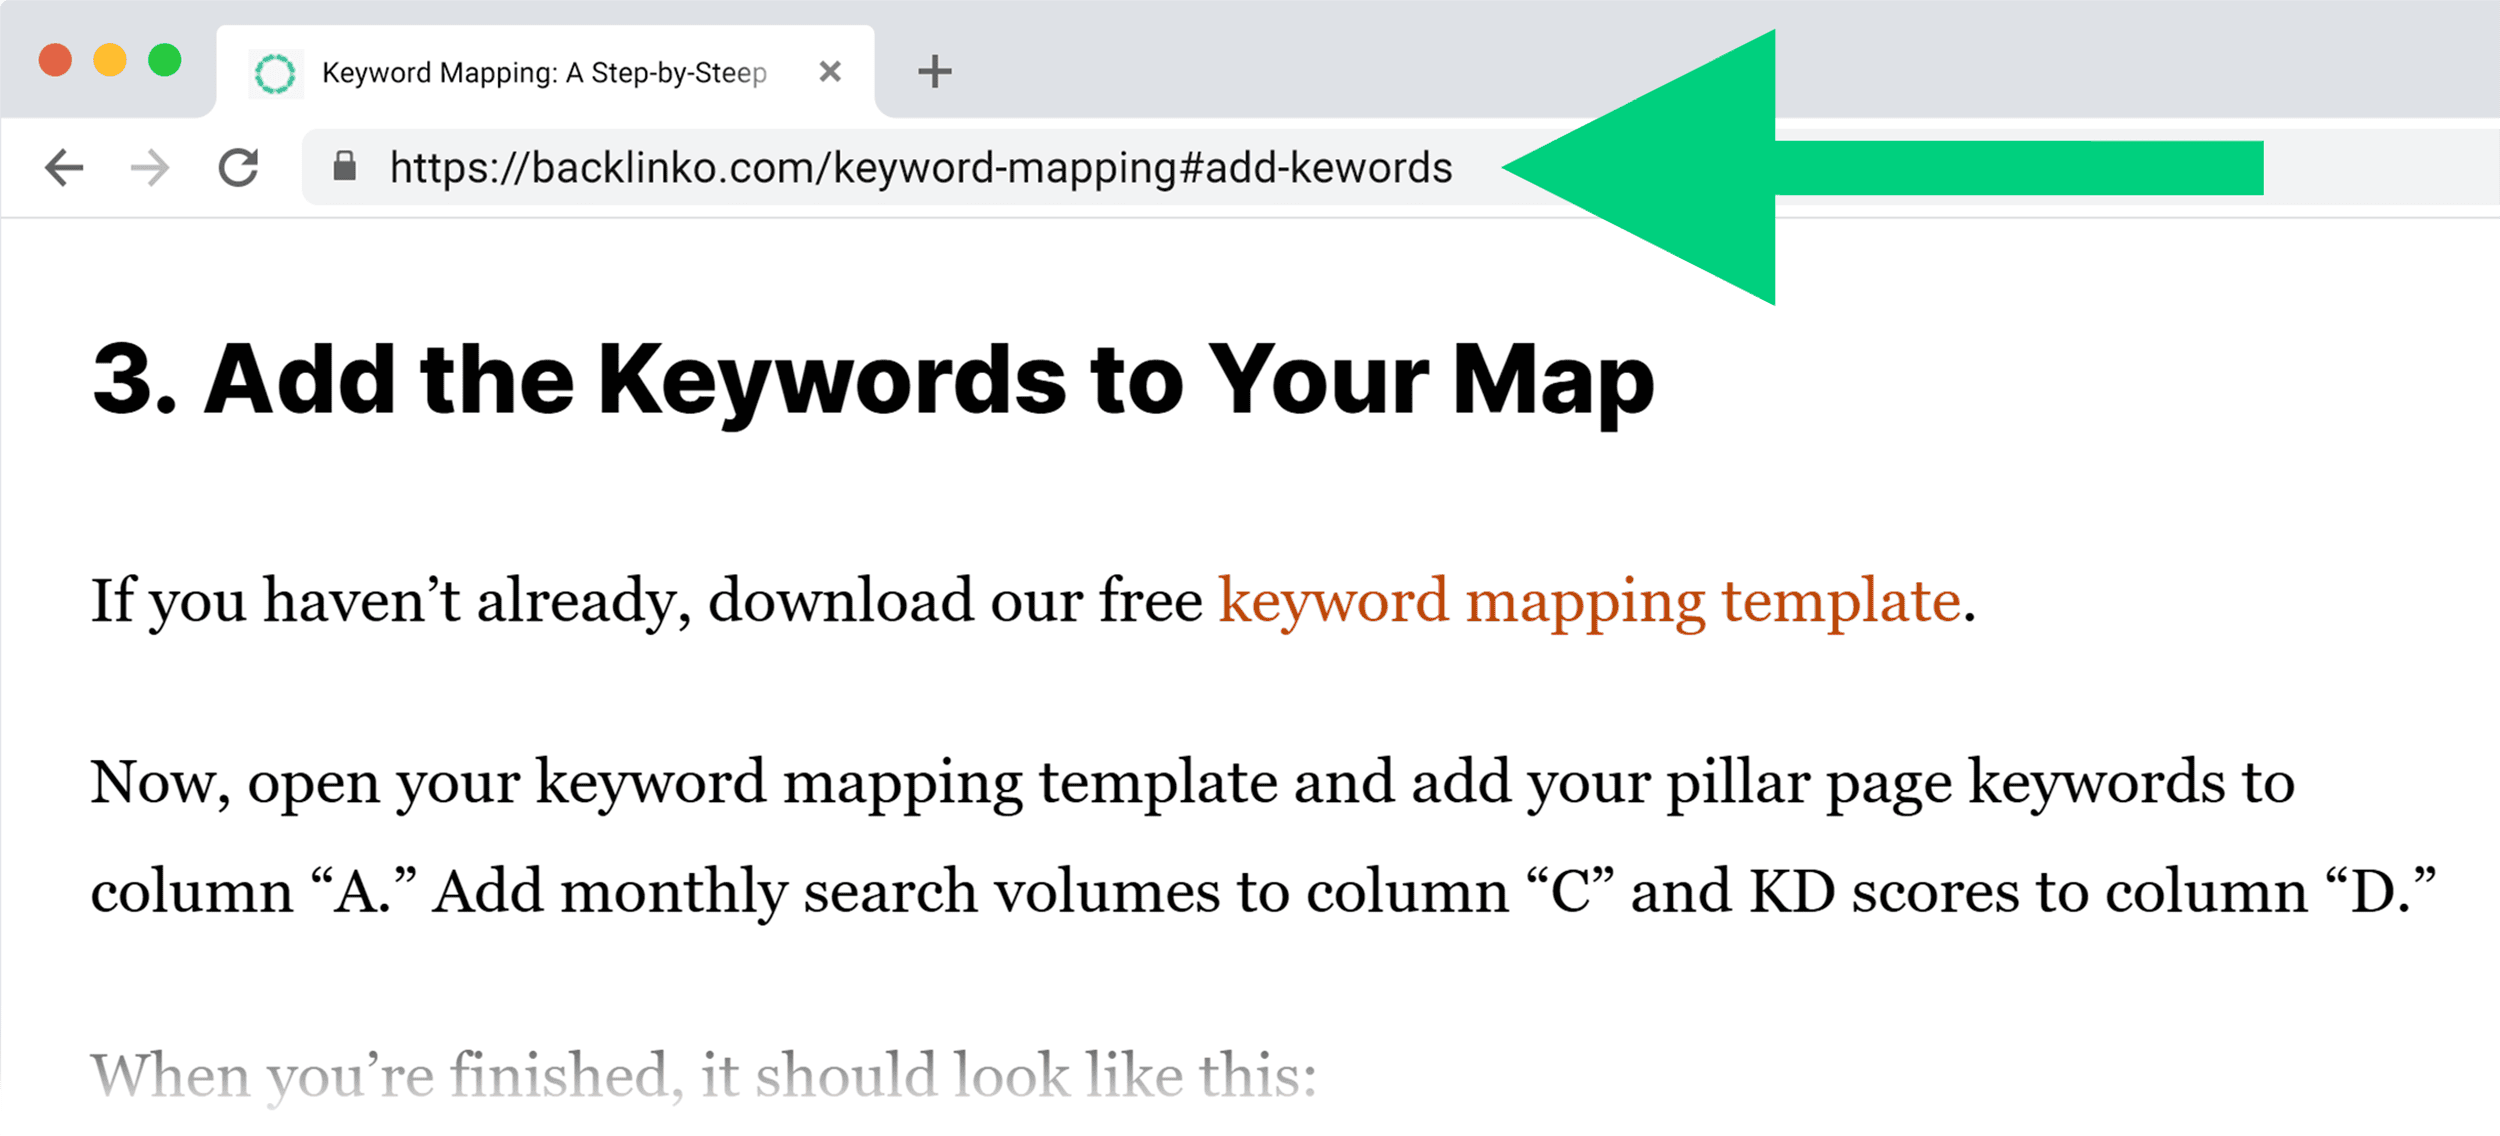
When a user clicks the link, the browser will instantly scroll to the element with the matching id (in this case, step 3). It’ll also update the URL in the address bar:
Jump links are perfect for:
- Tables of contents at the top of articles
- “Back to top” links at the end of sections
- FAQ pages where users want to jump to specific questions
- Product pages with multiple information sections
Button Links for Calls to Action
HTML links over buttons combine the functionality of an <a> tag with the appearance of a button.
They’re perfect for calls to action that need to stand out and attract clicks.
The key difference between a button-style link and a regular link is that you’ll typically code HTML button links with CSS:
<a href="yourdomain.com/signup" class="button-link">Get Started</a>
This HTML looks like a standard text link, but with CSS, you can transform it:
.button-link {
  display: inline-block;
  padding: 10px 20px;
  background-color: #0066cc;
  color: white;
  text-decoration: none;
  border-radius: 4px;
  font-weight: bold;
  text-align: center;
}

.button-link:hover {
  background-color: #004080;
}
These styles create a rectangular button with:
- Clear boundaries (background color and padding)
- Rounded corners (border-radius)
- Visual feedback on hover (background color change)
For mobile users, make sure your button-style links are large enough to easily tap:
@media (max-width: 768px) {
  .button-link {
    padding: 12px 24px;
    width: 100%;
    margin-bottom: 10px;
  }
}
It’s worth noting that in a lot of cases, you won’t need to code button links yourself. If you’re using a CMS like WordPress, for example, you might use button templates of some kind.
Or perhaps, your developer will use CSS classes to create buttons rather than using HTML link codes.
Download Links
Download links let your users easily save files from your website to their devices.
The basic HTML for a download link uses the download attribute:
<a href="report.pdf" download>Download PDF Report</a>
For files that browsers typically display rather than download (like PDFs), the download attribute ensures they’re saved instead of opened.
Many browsers will download other file types by default, without the need for a separate download attribute. This is often true for things like Excel and Word documents.
Note: Sometimes your server configuration will dictate whether a file will open or download by default. If you’re not sure, speak to your developer.
Other Important HTML Link Code for SEO
There are a few HTML link attributes you should be aware of for your site’s SEO. These don’t create hyperlinks, but they do go inside an HTML link element in the <head> portion of your page’s code.
This element looks like <link> rather than <a>.
Canonical Tags
Canonical tags (technically attributes) tell search engines which version of a page is the “primary” one when you have similar or duplicate content across multiple URLs. They help prevent duplicate content issues that can hurt your SEO.
But it’s good practice to implement them on all of your pages.
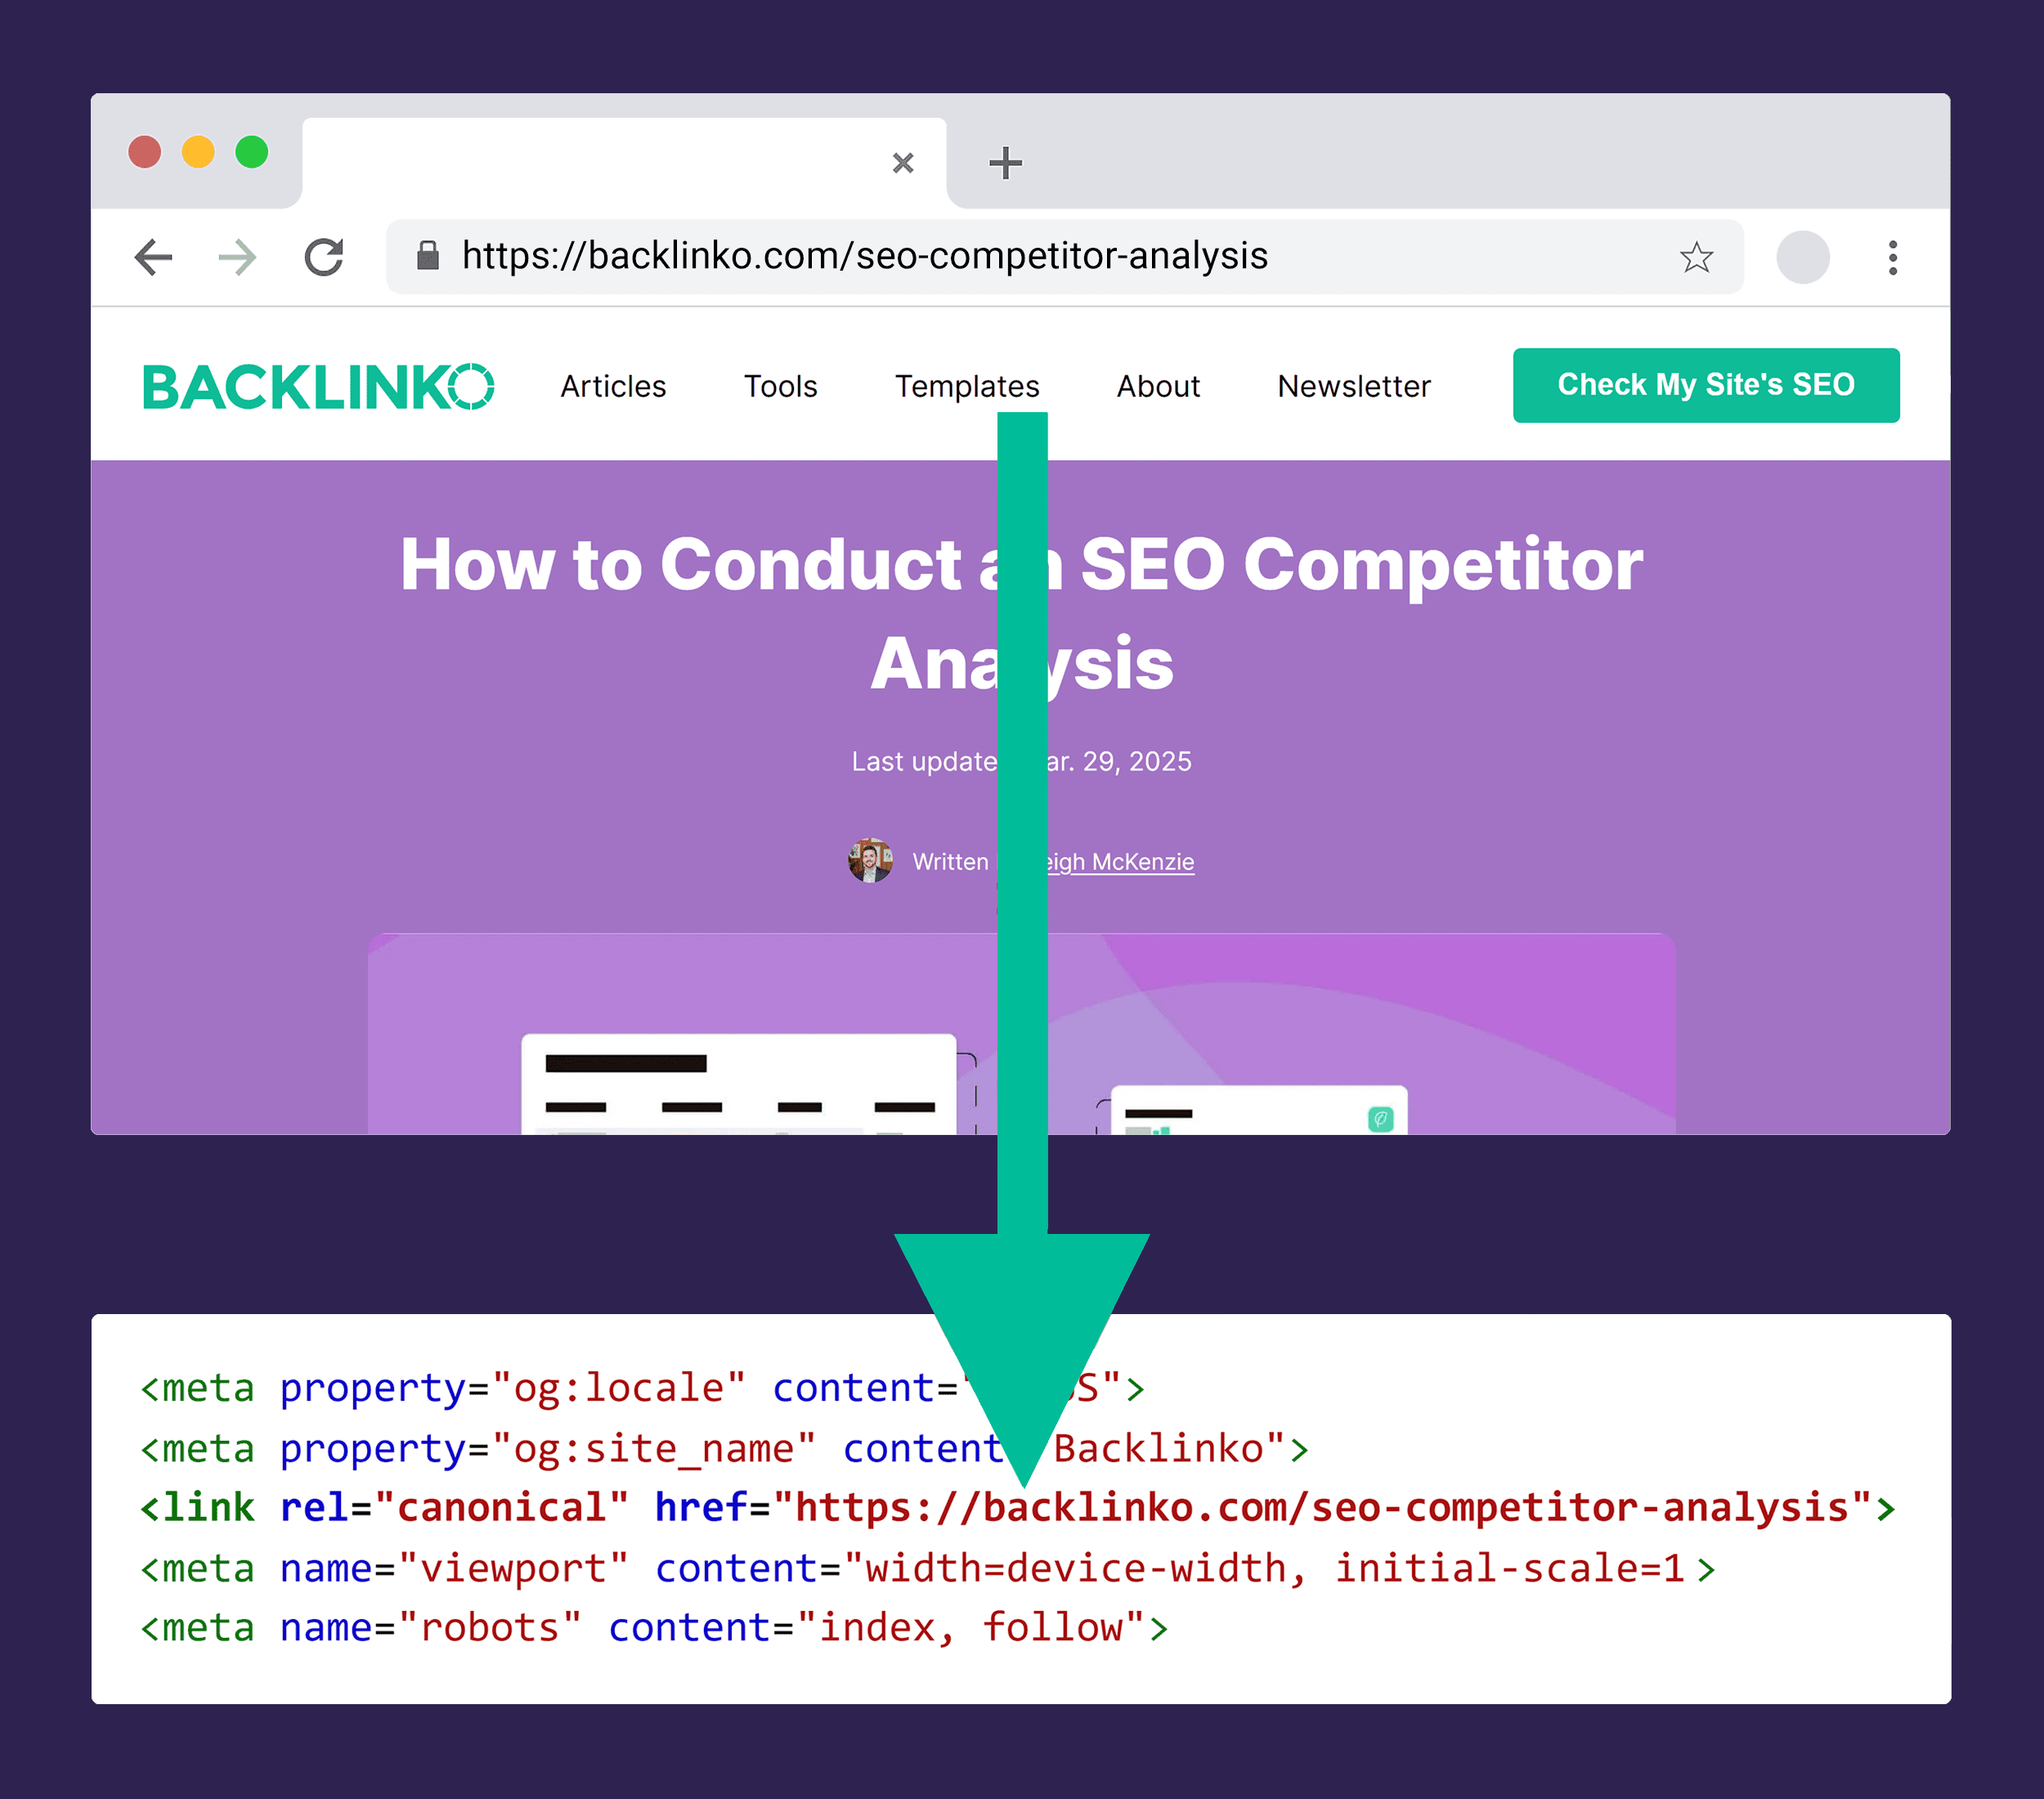
You implement canonical tags using a <link> element in the <head> section of your HTML:
<head>
<link rel="canonical" href="https://example.com/original-page">
</head>
This effectively tells search engines: “This page is a copy or variation of the page at the specified URL. Please attribute all ranking signals to that URL instead.”
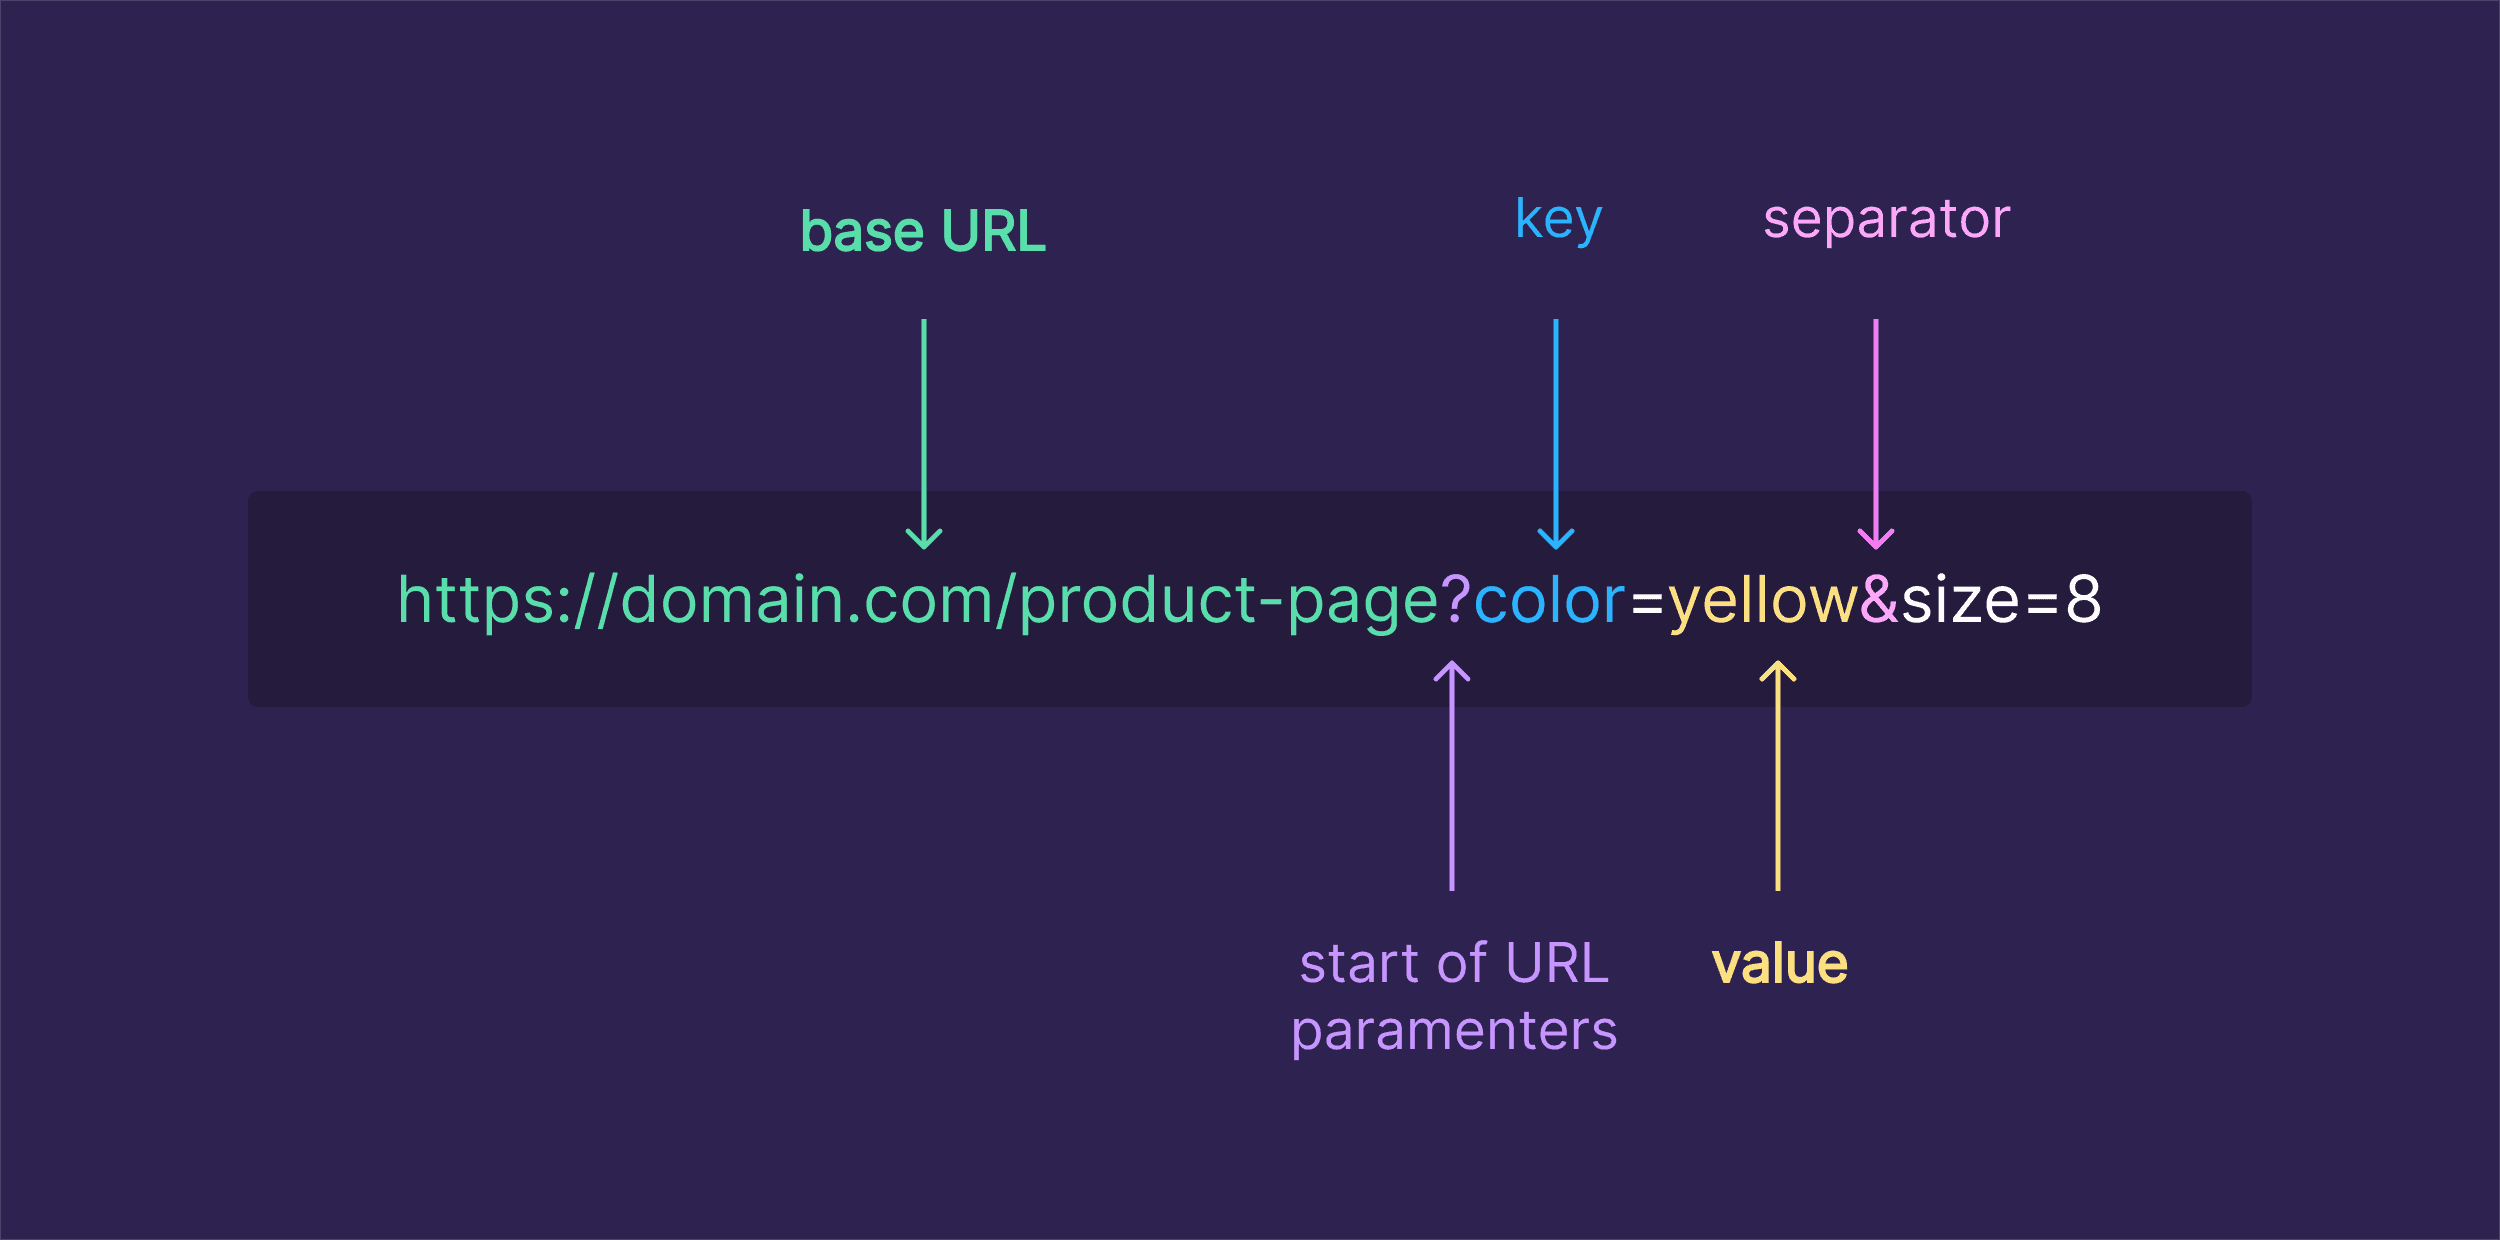
Canonicalization can help when you have URL parameters for tracking, filtering, or sorting (e.g., ?source=email or ?sort=price).
Hreflang
The hreflang HTML link attribute helps search engines understand the language and regional targeting of your pages. This helps them understand which version of your page to display to users in search results.
As with canonical tags, you implement it using link elements in the <head> section of your HTML:
<head>
  <link rel="alternate" hreflang="en-us" href="https://example.com/en-us/page">
  <link rel="alternate" hreflang="es" href="https://example.com/es/page">
  <link rel="alternate" hreflang="fr" href="https://example.com/fr/page">
  <link rel="alternate" hreflang="x-default" href="https://example.com/">
</head>
These link elements tell search engines:
- This page is available in English (US), Spanish, and French
- The default version (for users speaking other languages) is at the root URL
The hreflang attribute uses language codes (like “en” for English) and optional region codes (like “us” for the United States).

Hreflang tags are only an issue for sites with different language versions and an international presence. They can be tricky to get right, so for more detailed info, check out our dedicated guide to hreflang tags.
HTML Link Code Best Practices
Following these best practices will ensure your links are effective, secure, and accessible to all users. And it’ll help improve your SEO too.
Syntax
Here’s the correct syntax for an HTML link:
<a href="url">Anchor Text</a>
Here are a few syntax rules to remember:
- Always include the opening <a> and closing </a> tags
- Add the href attribute along with a value (your URL)
- Enclose attribute values in quotation marks
- Don’t use spaces between the attribute, equals sign, and value
Anchor Text
Anchor text is the clickable text of your link. It’s the words users actually see and click on. It plays a crucial role in both user experience and SEO.
Good anchor text clearly tells users what to expect when they click a link. It also provided
Here’s an example of poor anchor text:
<a href="https://example.com/pricing">Click here</a>
And here’s an example of good, descriptive anchor text:
<a href="https://example.com/pricing">View our pricing plans</a>
The second example gives users (and search engines) clear information about where the link will take them.
When writing anchor text, follow these guidelines:
- Make it descriptive and relevant to the destination
- Keep it concise (typically 2-5 words)
- Avoid generic phrases like “click here” or “read more”
- Use keywords naturally, but don’t stuff them in
Title Attributes
There’s also a “title” attribute you can add to links. But you generally don’t need this if you use descriptive anchor text.
In fact, using it can reduce readability and accessibility if it just repeats the anchor text. Screen readers usually won’t read it out, and users hovering over the link will see a tooltip that may just block other content on the screen. Plus, it won’t display on mobile devices at all.
So, unless you can meaningfully add important information about the link, don’t use the title attribute. And instead just make your anchor text descriptive.
Aria Labels
ARIA (Accessible Rich Internet Applications) labels enhance accessibility by providing additional context for screen readers and other assistive technologies.
The aria-label attribute provides an accessible name for a link when the visible text isn’t descriptive enough, or for links over icons rather than text:
<a href="https://yourdomain.com/settings" aria-label="Go to settings">
  <svg><!-- settings icon --></svg>
</a>
In this example, a screen reader would announce “Go to settings” but the site would only visually display a settings icon.
Target
The target attribute determines how your link opens when a user clicks on it.
The default link behavior opens the link in the same tab (i.e., you go from the current page to the linked page).
The default value is “_self” but you don’t need to specify that.
If you want to open the link in a new tab, use the “_blank” target value:
<a href="https://example.com" target="_blank">Example</a>
You used to need to add rel=“noopener” to links with a blank target value for security reasons. But you no longer need to do this. (More on noopener below.)
Opening your link in a new tab is particularly useful when:
- Linking to external websites
- Providing reference material that users might want to check while staying on your page
- Linking to downloads or resources that would disrupt the user’s current activity
Opinions vary on whether this is best for accessibility. Some believe this creates a disruptive user experience, especially on mobile and for those using assistive technologies (like screen readers).
For internal links that are part of the natural navigation flow, it’s usually best to stick with the default behavior (opening in the same tab).
Note: There used to be other target values (_parent and _top), but these are deprecated in HTML5.
Relationships (rel=)
The rel attribute defines the relationship between your current page and the page you’re linking to. It’s an important attribute that affects both security and SEO.
The default behavior is to not add any rel values. But here are a few of the most common ones:
Sponsored Links
You use the sponsored rel value when another brand has paid to have a link on your site.
For example, let’s say you have an affiliate link to a product you promote.
This is a form of paid or sponsored link, because you might earn money from purchases users make through that link. Google recommends you use the “sponsored” attribute for paid link placements:
<a href="https://example.com" rel="sponsored">Paid link</a>
Here’s an example of this on WireCutter, a popular product comparison website:
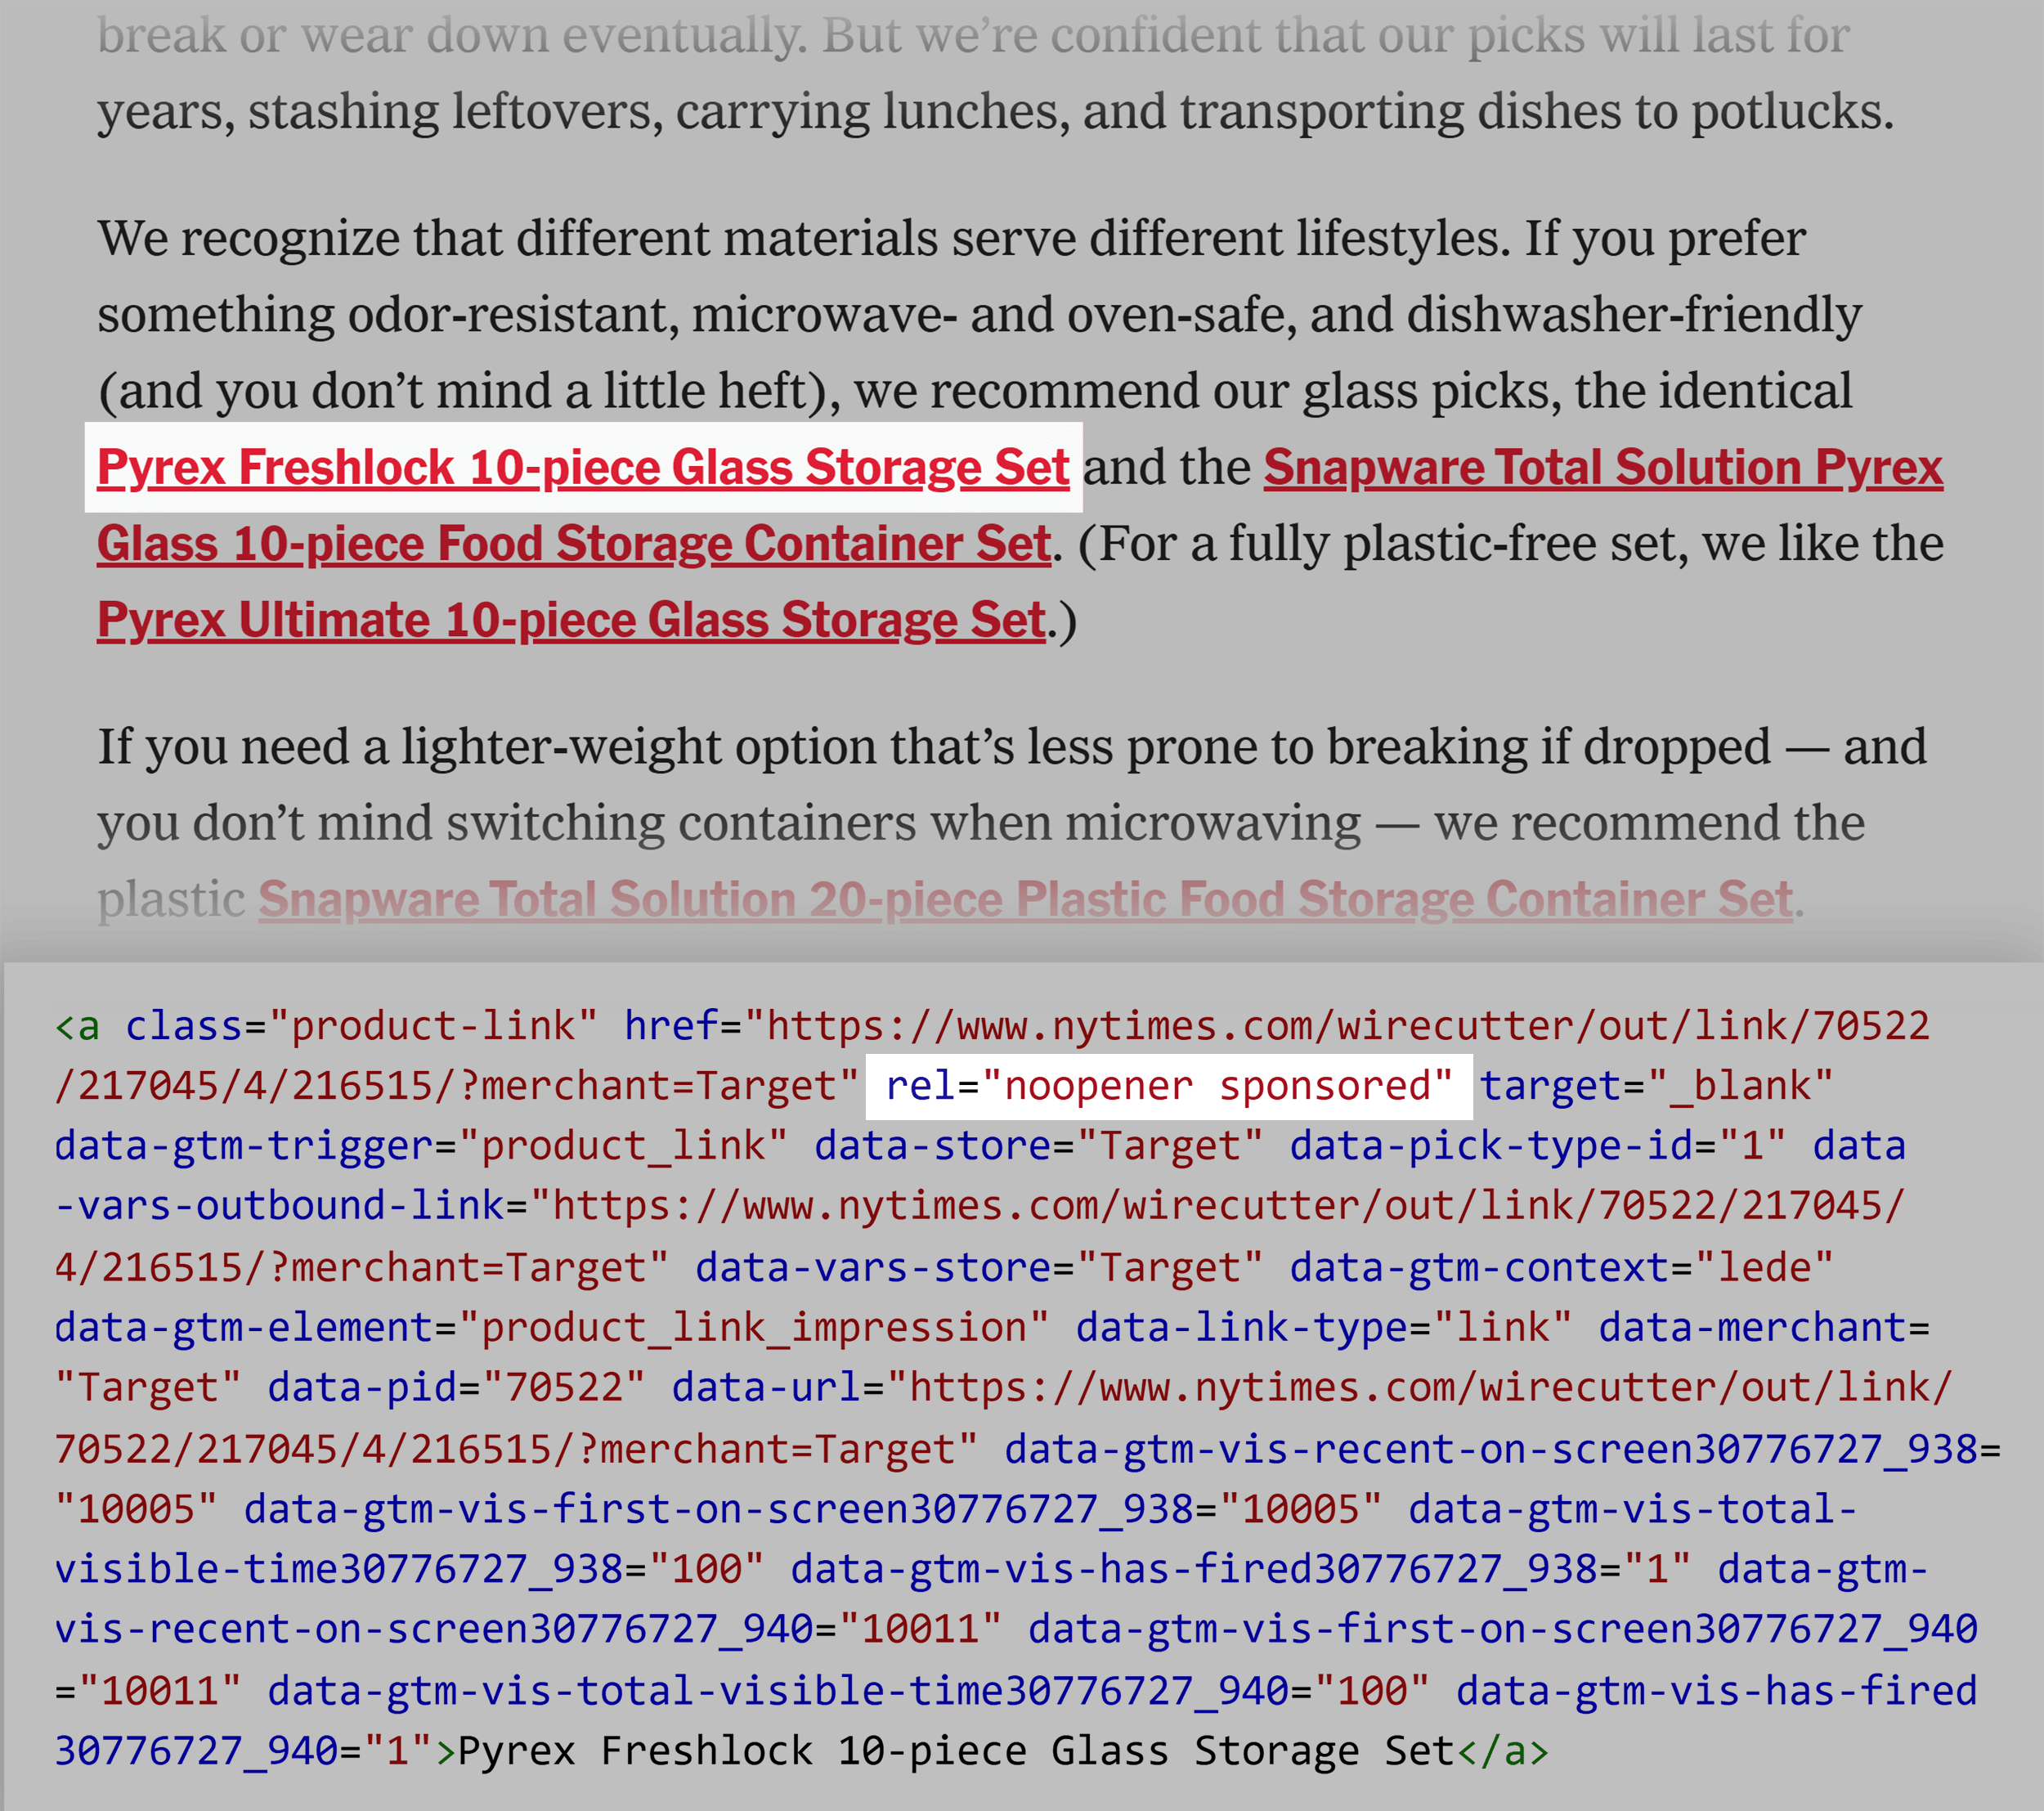
You would also use this attribute for links other companies have explicitly paid you to include on your site.
UGC Links
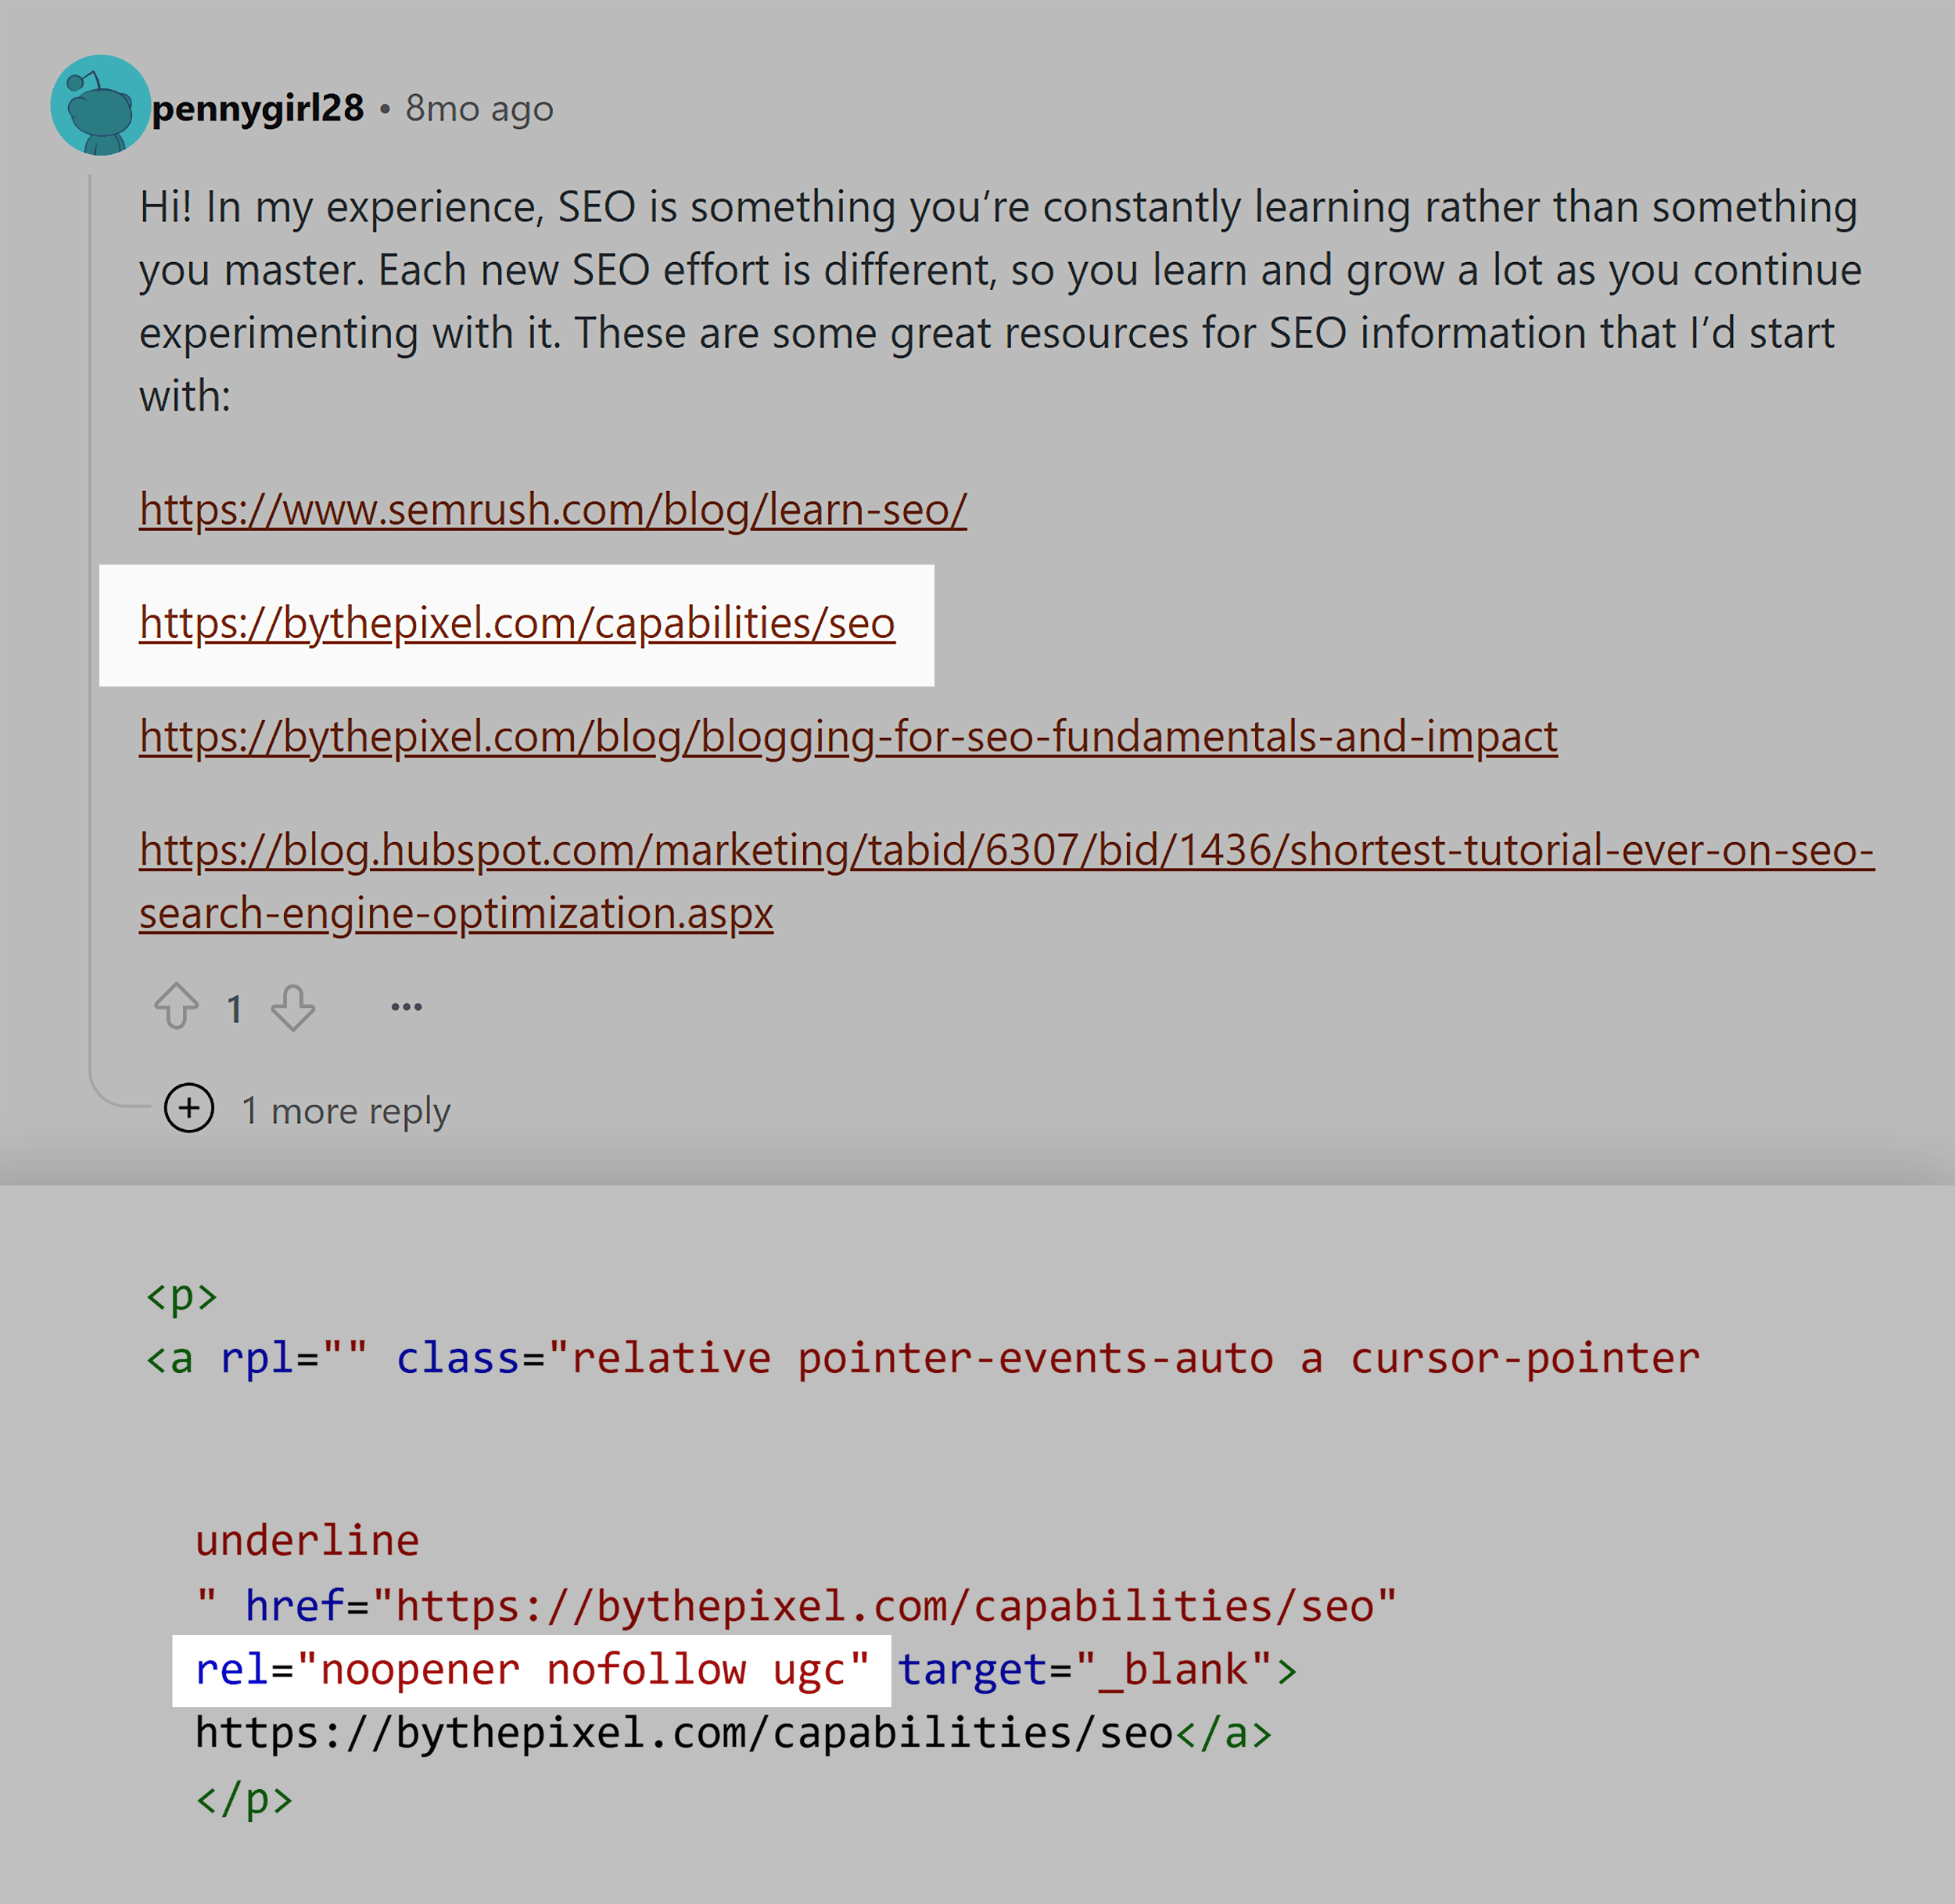
Use the user-generated content rel value on links in comments and forum posts. These are links you don’t necessarily control, and this tells Google that you don’t endorse them.
<a href="https://example.com" target="_blank" rel="ugc">External site you haven’t verified</a>
Nofollow Links
Use nofollow when none of the other rel values apply and you don’t want Google to associate your site with the one you’re linking to. Or when you don’t want Google to crawl the page you’re linking to.
<a href="https://example.com" rel="nofollow">Link to a site you don’t endorse</a>
Let’s say you’re not the one creating the links on your site so you can’t verify them before they go live. Maybe you have a team of writers, or you’re accepting guest posts.
But you know the links are not sponsored or in user-generated content. In this case, you’d use nofollow.
What About “noopener” and “noreferrer”?
The “noopener” rel value tells your browser to go to the target link without giving the new location access to the page with the link.
If you’re using target=“_blank” then modern browsers will essentially treat it as if you have added noopener. But you can also use it on other links you don’t necessarily trust but aren’t using the _blank target value for. Like those you’re also adding nofollow to.
Using the “noreferrer” value hides the origin of any traffic sent through that link in the analytics of the site you’re linking to.
You can combine multiple rel values by separating them with spaces:
<a href="https://example.com" rel="noopener noreferrer sponsored">Affiliate link</a>
Absolute vs. Relative URLs
When creating an HTML link, you need to decide whether to use an absolute or relative URL in the href attribute. Each has specific use cases and advantages.
Absolute URLs include the complete web address, starting with the protocol:
<a href="https://example.com/products/item1">Product page</a>
Relative URLs are shorter and reference locations relative to the current page:
<a href="/products/item1">Product page</a>
Generally, I’d recommend you use absolute URLs in most cases.
Using relative URLs can speed up production if you’re working with lots of them. Plus, if you move pages or domains but keep the same URL structure, your internal URLs should all continue working without you having to change them all to the new domain.
But honestly, unless you’re planning a major website migration at the time you’re setting up your site (unlikely), you aren’t likely to foresee and then benefit from this relatively minor advantage.
You might want to use relative URLs when working with a staging site that’s on a different domain from the site you’re developing.
In this case, it can avoid you or your developers having to rewrite all the internal links when you push your site live.
How to Check Your Site’s HTML Links
You can manually check the code of an HTML link in your browser with the inspect tool. Just right-click over the link you want to check and select “Inspect” to open up the developer console:
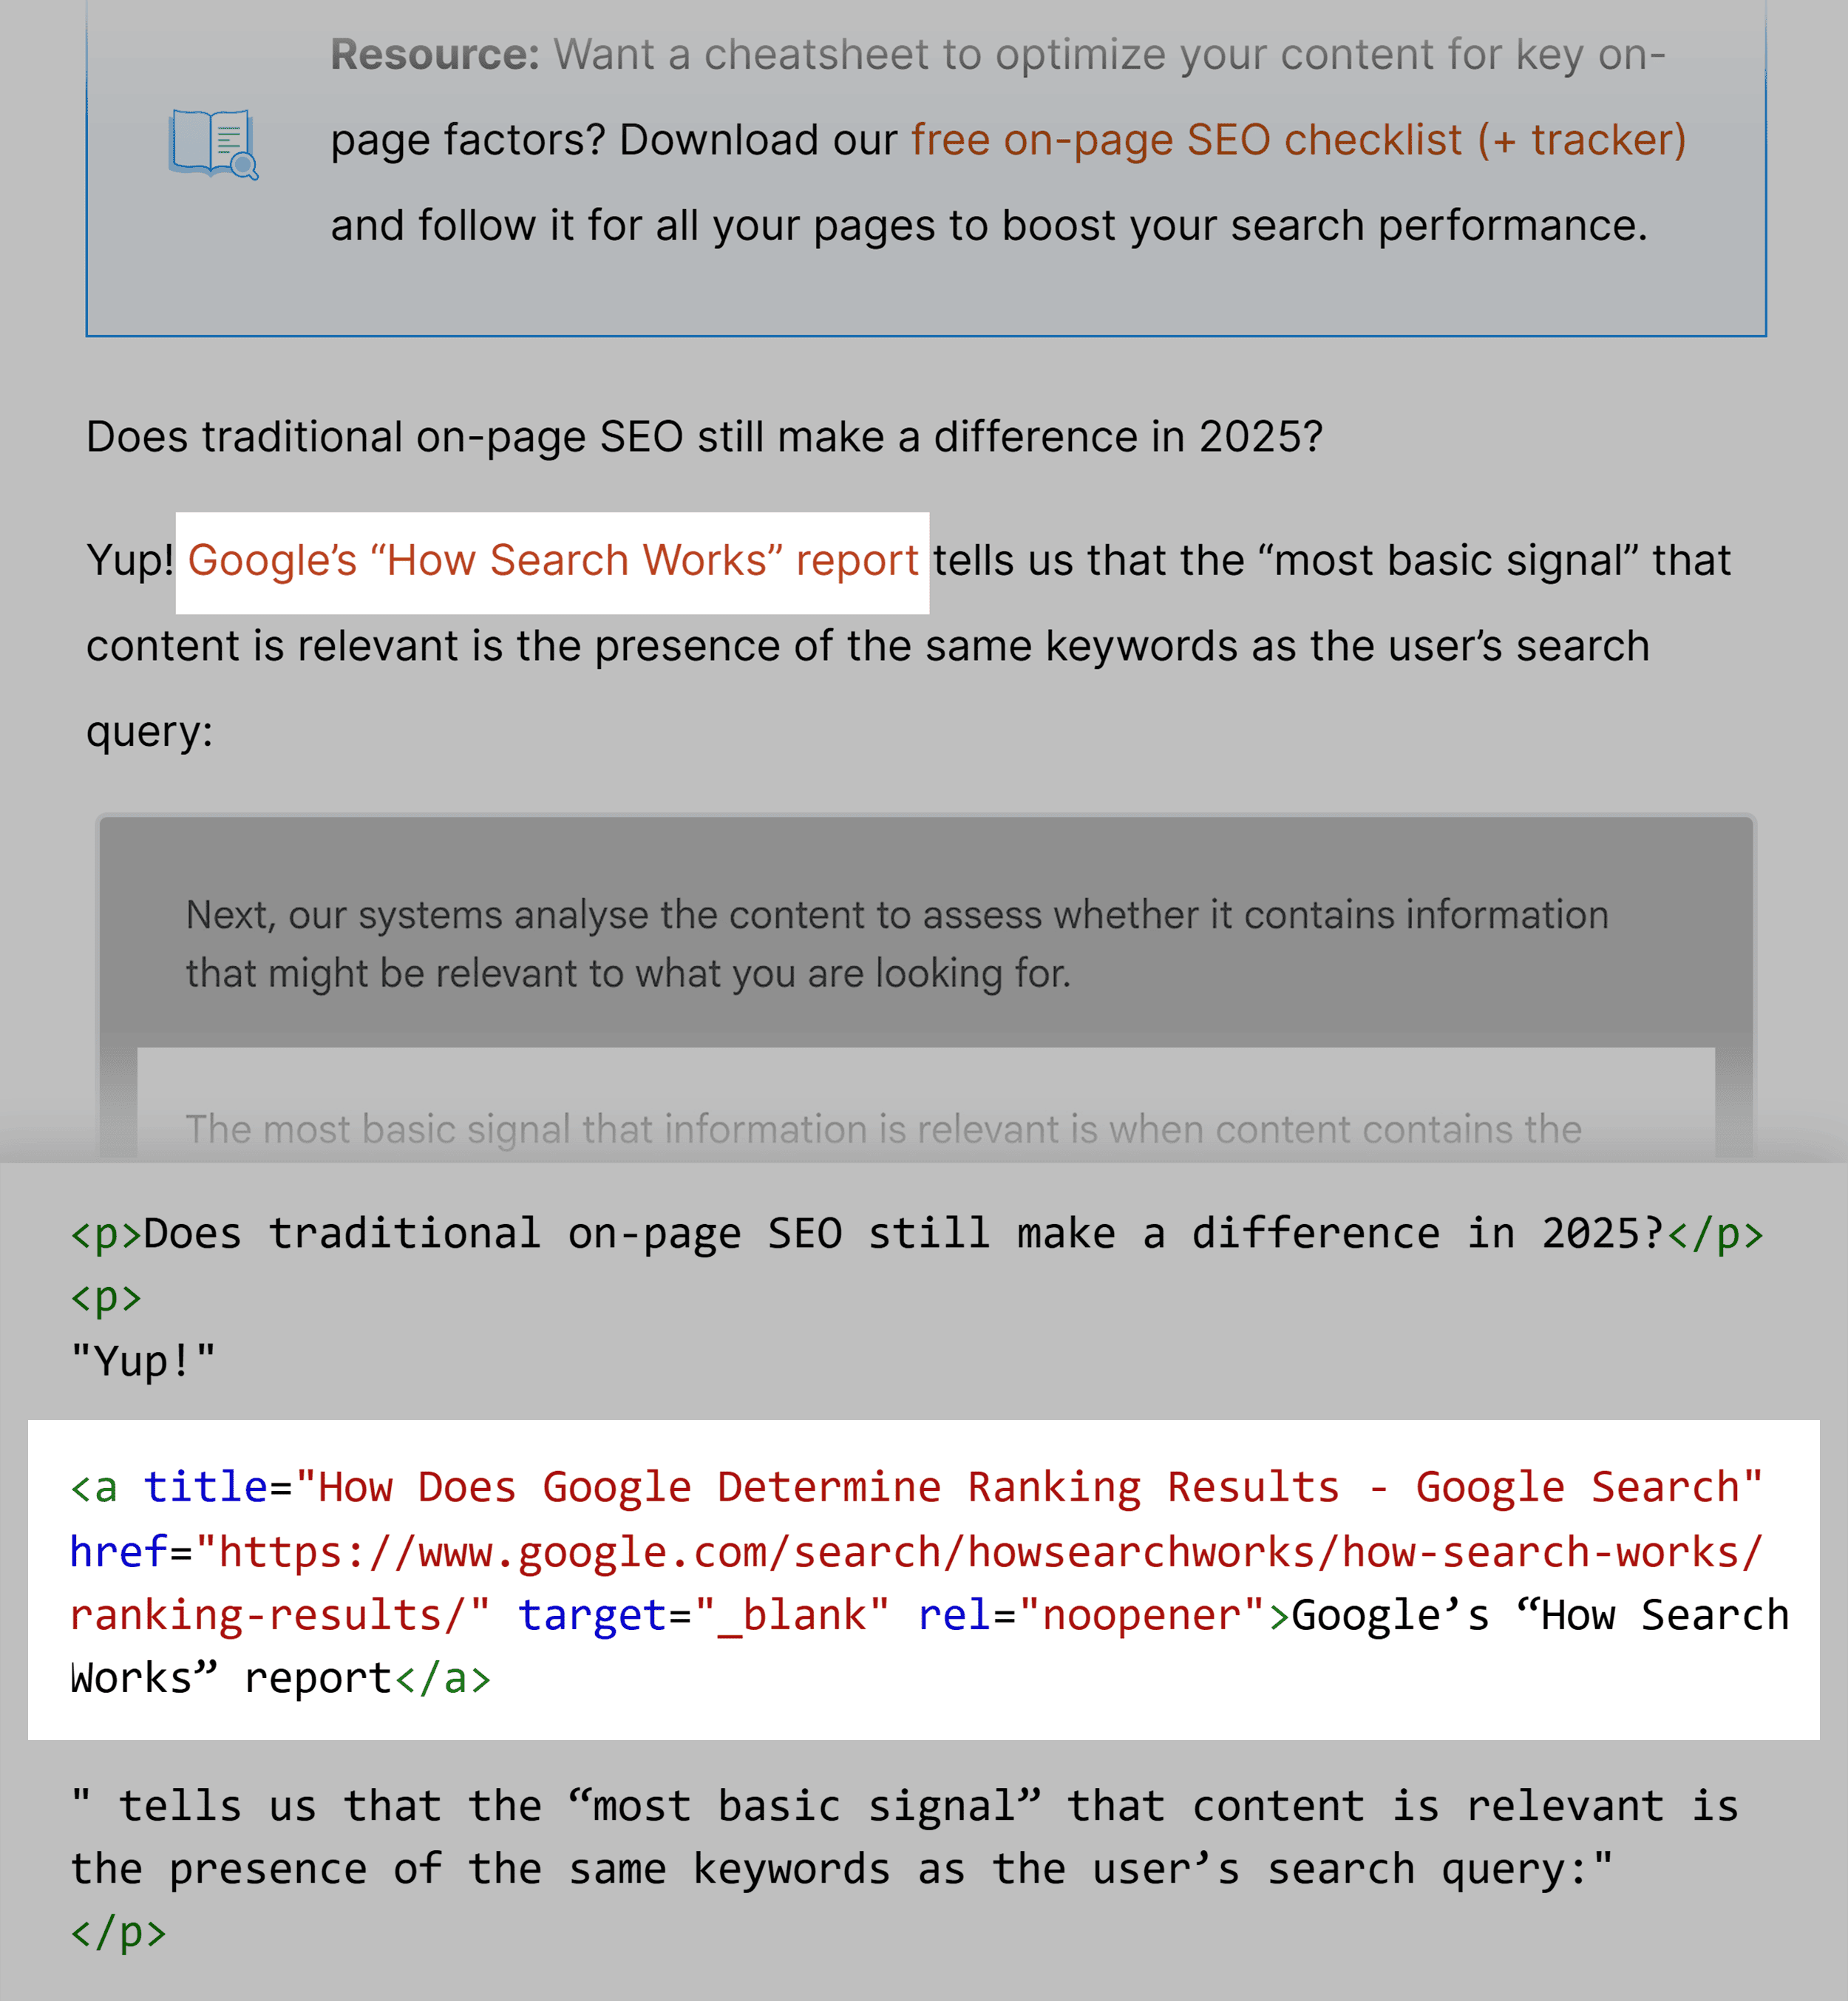
This is handy for quickly verifying your attributes and rel values.
But what if you want to check your links at scale?
That’s where a tool like Semrush’s Site Audit comes in.
Just plug your domain in, let the audit run, and head to the “Issues” tab. Then type in “link” to highlight any issues with your site’s HTML links.
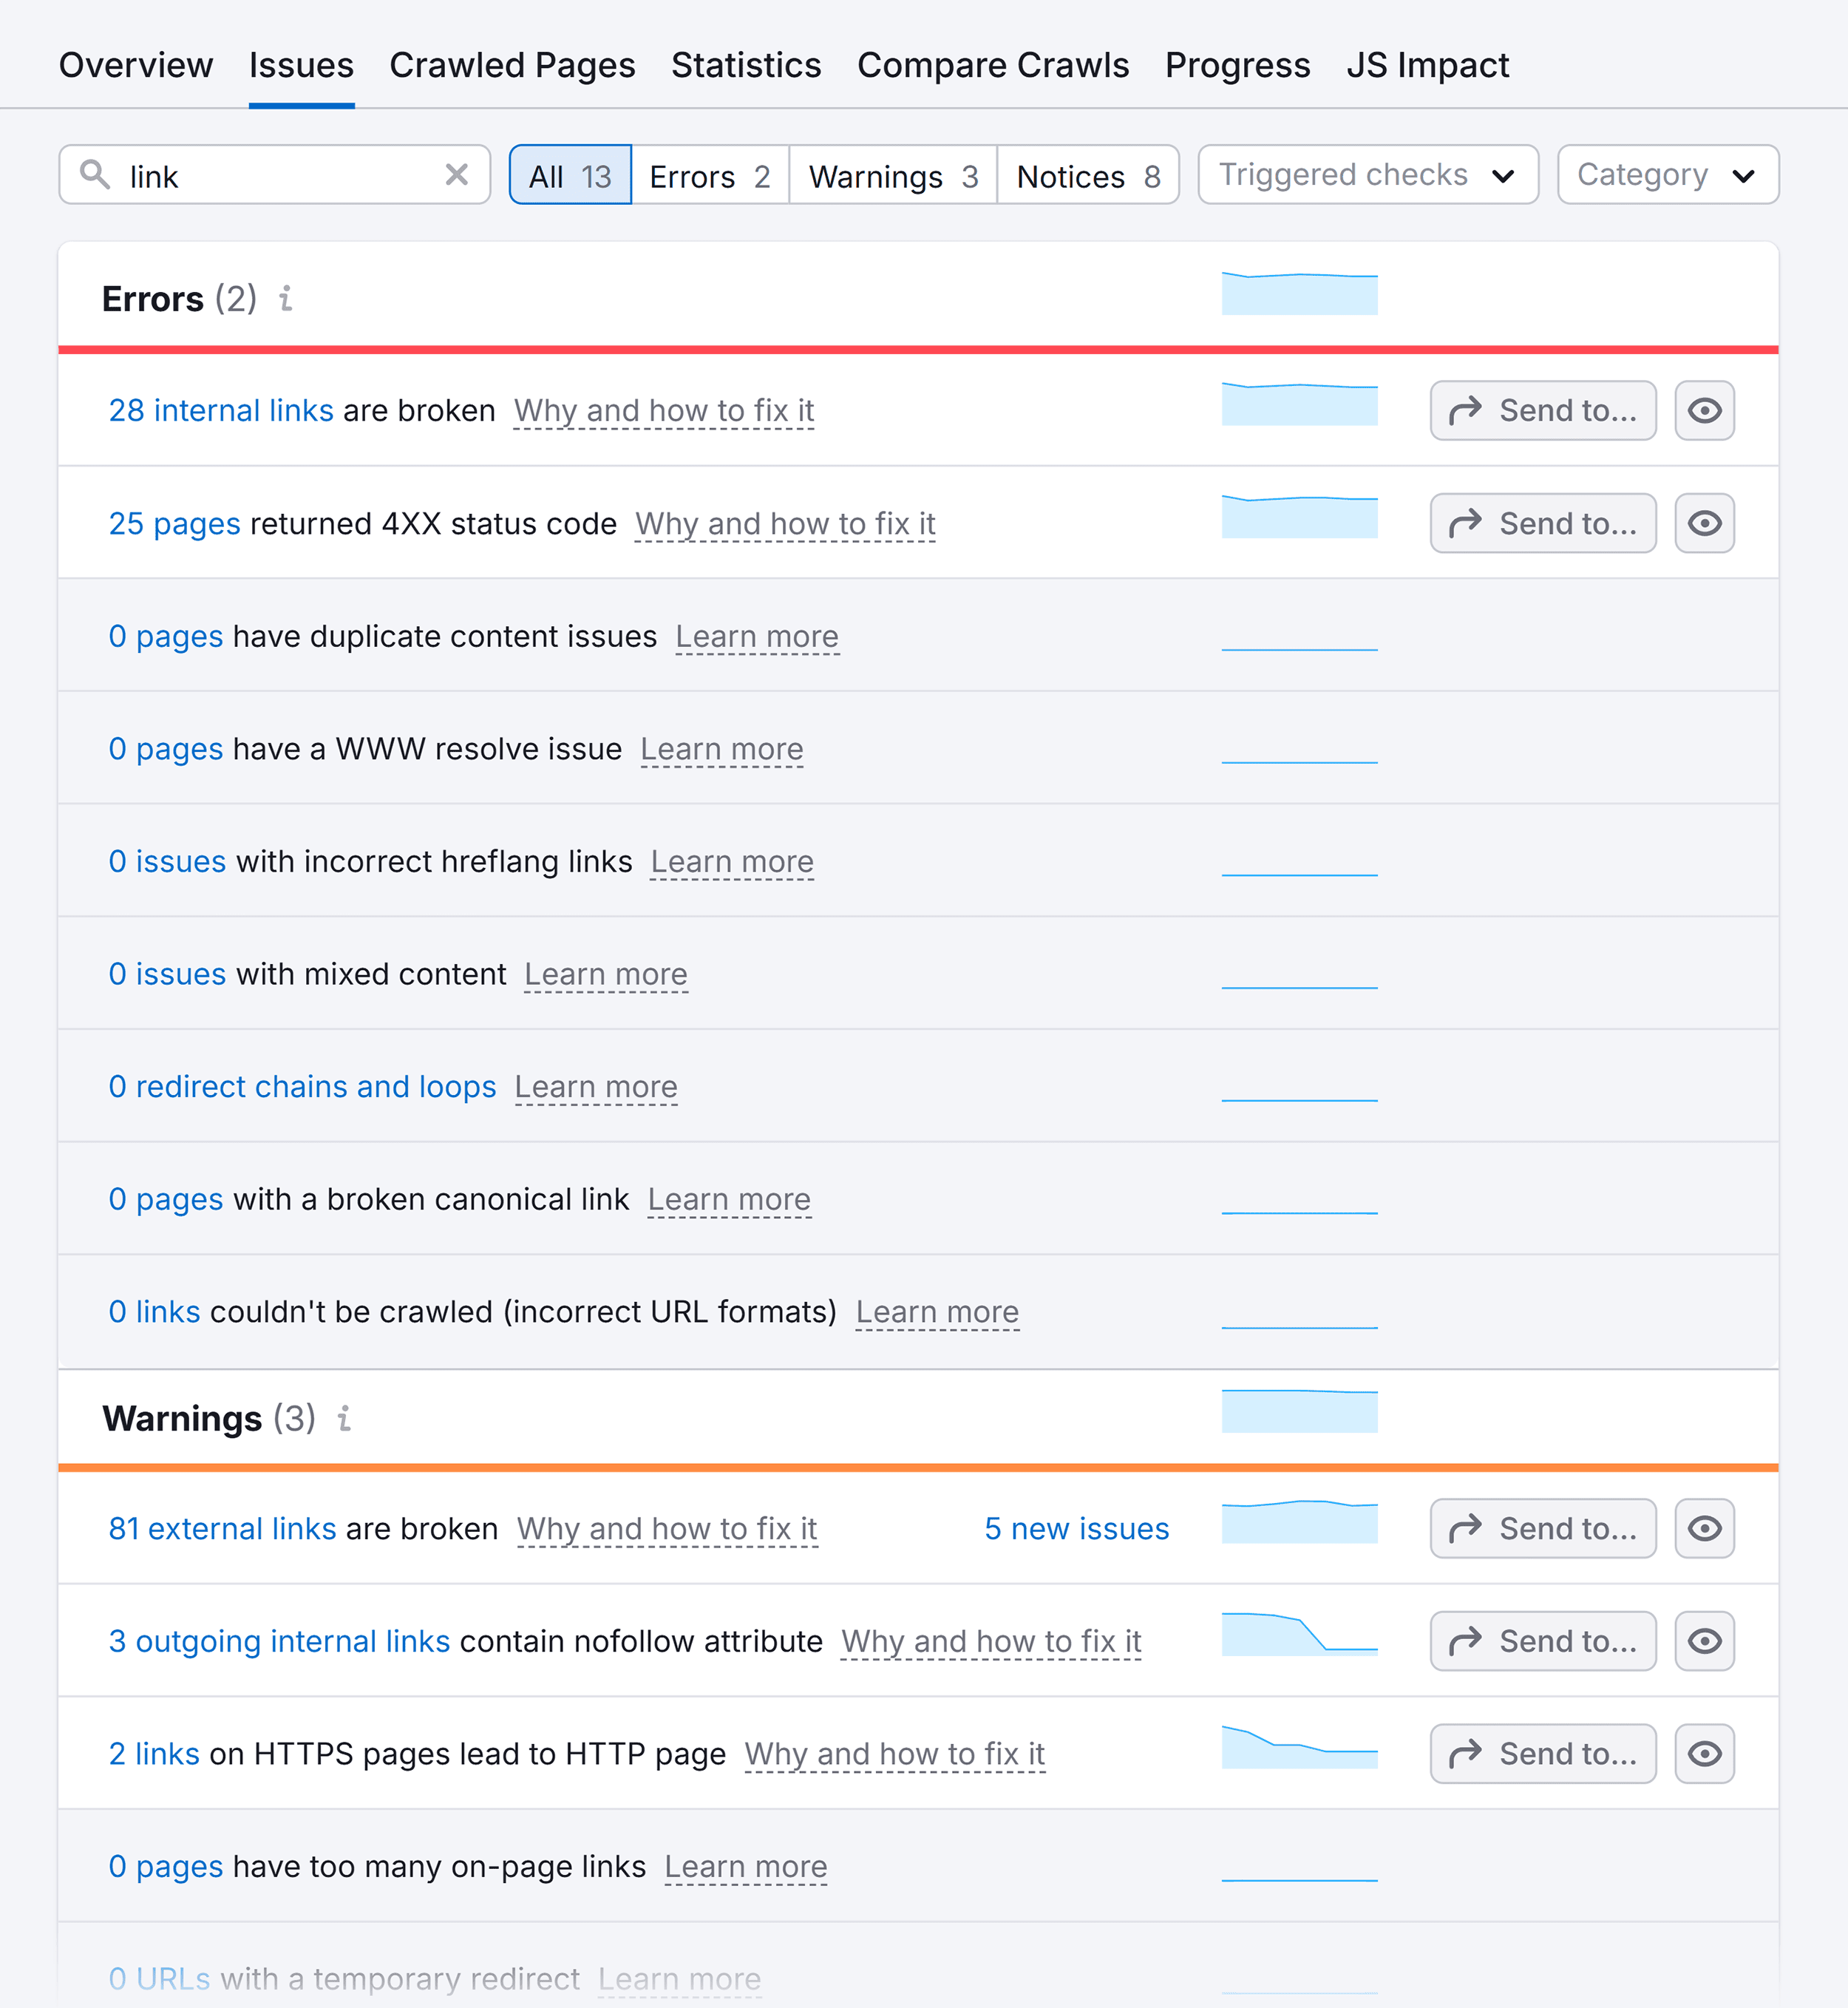
Go through and fix any issues to improve your site’s SEO and user experience.
Note: A free Semrush lets you audit up to 100 URLs. Or you can use this link to access a 14-day trial on a Semrush Pro subscription.
The post HTML Link Code: How to Create Hyperlinks on Your Site appeared first on Backlinko.


