Getting captions onto your videos is one of the most important things you can do in order to optimize your videos for search, but it isn’t immediately obvious how to do this. Especially as each of the common video platforms has a slightly different approach to acquiring and adding captions. Also, after you’ve got the captions on the videos, there is the question of ensuring Google can find and read the captions.
In this post, we’ll go into how to get your video transcribed, how to add these captions to your video and how to optimize them for online search. These steps help you make videos more accessible and optimize them for video SEO. Let’s get started!
Step 1: Acquire captions
The first step in adding and optimizing captions is to actually get your video transcribed. There are a few ways to do this. The right choice for you will depend on how much time and budget you have available.
Transcribe the video yourself
If you care primarily about accuracy and have the time available, this is the most surefire way of ensuring the captions for your videos are complete. You will need to type out the spoken text and mark different speakers as characters. But you’ll also need to align each phrase and sentence with the correct timecodes. This guide is an excellent rundown of every step required, and how you can format the timecode correctly so that it can be exported as a .srt file (SubRip Text – the plaintext format almost universally used to contain video captions).
Pay for a professional transcription service
This is the method to choose if you have less time available, but do have some budget. There are many excellent transcription services on the market and prices are usually between $1 and $10 a minute. Depending on the level of guaranteed accuracy required. To provide you with some suggestions: 3playmedia, Speedpad and Rev are all good options.
Use automated transcription software
This is the method to choose if you want a quick and cheap solution. Tools like Temi, Trint, and Descript can all impressively process a video or audio file and almost instantly pull together the captions along with the timecodes. However, accuracy here isn’t generally as good as the services which include some human overview. Especially when using very technical or esoteric words, things can go awry. However, combining an automated transcription with some human overview is an effective way to get the best of both worlds.
Download the captions from YouTube
Very helpful, YouTube automatically transcribes all the videos uploaded to the platform. These are visible within the “subtitles” menu of any video within YouTube Studio. They are flagged as (automatic) to indicate that these are the captions YouTube has generated itself.

From this menu, you can then edit (to improve) the captions, or download them as a .srt file, which you can bring into any other video platform if required.
This is the method to use if you’re uploading the video to YouTube and don’t want to pay for human-edited captions.
Step 2: Get your captions onto your videos
Once you’ve acquired your captions, the next challenge is to get the captions onto the video itself. That way they can be displayed on the video during playback. Not only does this help with accessibility, but it also helps the consumption of content when autoplayed silently. As is common on platforms like Twitter and Facebook.
Each video platform has a slightly different method for adding captions to their videos, although the overwhelming majority make use of the .srt plain text format. If you have your captions available in a .srt file, the next step of getting them onto the video is fairly straightforward. Here are the instructions for each of the major video platforms and social networks.
Wistia
Go to the “Customize” menu for the video in question, then select “captions”. Within this menu, you can upload your .srt file.
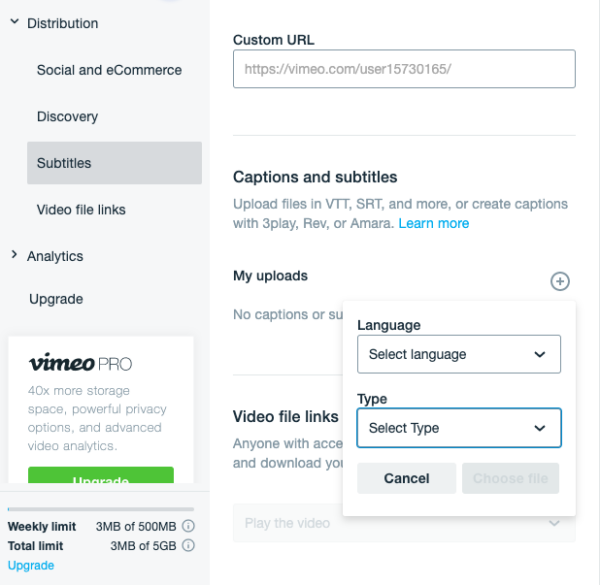
Vimeo
Captions can be added via the “distribution” menu under “advanced” for any video (see below). When uploading captions, you need to stipulate the language in advance.

YouTube
Captions are generally referred to as “subtitles” within the YouTube taxonomy. That’s why there’s a section for subtitles within the YouTube creator studio. Here you can upload new captions, amend the automatically generated captions and add new languages. Including in-language international title and description variations.
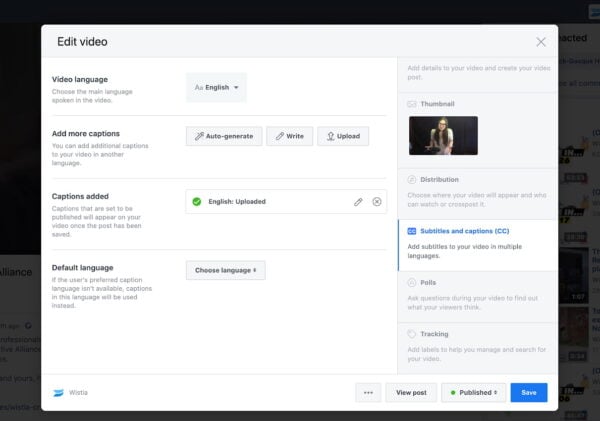
For Facebook videos, you can upload and match captions to the appropriate language via the “edit video” screen of the Video Manager feature. This is the best way to manage it, as then all future posts with this video will include the captions.

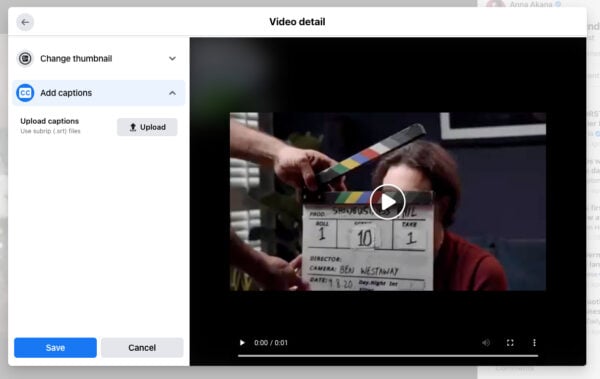
Alternatively, when posting a video from a personal account, or just as a one-off, you can also add captions directly to the video in the post by clicking “edit video” via the menu once the post is live.
Then you can select “add captions” and upload a .srt file.

As things stand, captions aren’t directly part of the Instagram infrastructure. Instead, the platform wants you to use visual means of telling a story or make use of additional visual elements and text which you add in-app. However, if you want to add captions to an Instagram video, you can “burn on” the captions directly to the video using a tool like Kapwing or wave.video.
As with Instagram, captions on Twitter videos can’t be uploaded via .srt files, except for videos distributed as ads. The best way to get captions on a Twitter video is to also ‘burn’ them onto the video via compositing.
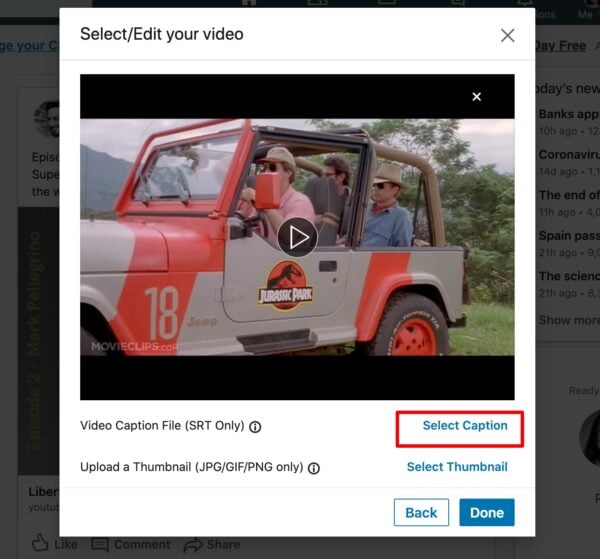
On LinkedIn, .srt files can be uploaded for each video once the video is uploaded (see below). These can only be in the native language of the video.

Step 3: Optimize the captions for search
After you’ve got your captions onto your videos, the final step is to ensure Google can find and index them. Unfortunately, Googlebot Video is not quite smart enough to be able to parse an embedded video player, find the associated closed caption file and index its contents. So our challenge here is to take the captions we’ve uploaded onto the videos and present them in a search-readable format.
There are basically two ways Googlebot can read video captions. Either as HTML text or as Schema markup using the “transcript” tag. In neither case is the timecode data needed, just the spoken text itself as plain text.
So, your options are either to include the captions with the page copy, as edited page copy or to just include the captions within the page metadata. The former approach is often the better option for things like a vlog or podcast recording. The latter approach might be more appropriate on a product page, or another instance where the video is not the sole focus on the page. For more information on including transcripts within the schema.org markup on a page, check out this post on how to optimize your video pages!
Adding captions: an important part of video SEO
In this post, we dove into captions for your videos. Also known as closed caption formatting or subtitles. Adding these captions to your videos makes them more accessible, easier to digest and optimizes them for Google and other search engines. If you want to do more to get your videos in the search results, the Video SEO for WordPress plugin can help you get started:
Get your videos in the search results!
Make your videos eligible for Google’s video carousel and the Google Video search results!
Read more: Video SEO: How to rank your videos in Google »
The post How to add captions to your videos appeared first on Yoast.


