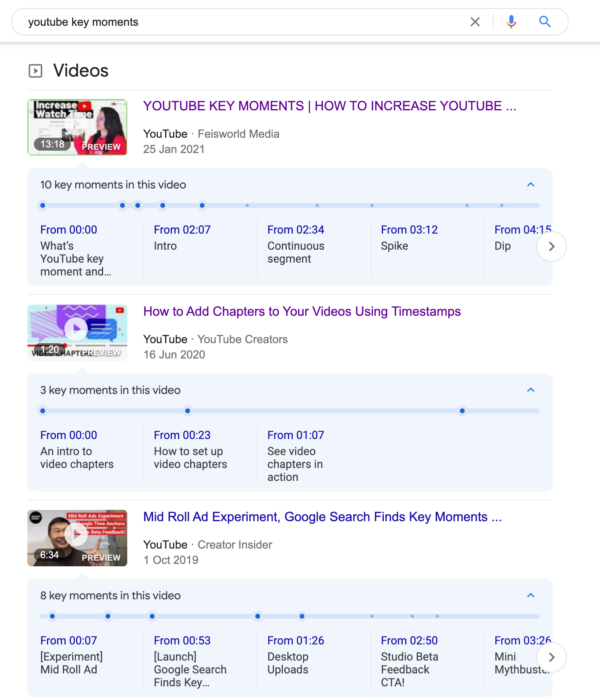
Key Moments arrived to Google search in late 2019. They are a feature that enables expansive, prominent video search results, with clickable links to each Chapter in your video. In practice, this means you can receive not just one link within your video results box, but dozens of them. To show Key Moments from your videos in the search results, you need to know how to timestamp a video.
This is clearly extremely powerful for SEO. It means you can ensure many, if not most, of the first results page links point to your content asset. This lets you capture a huge share of voice for some competitive informational queries, assuming your video content can rank for them.

The right video content, in this context, is longer-form tutorials or conversations – the kind of videos well suited to chaptering. This might be a good prompt to start thinking about investing in a video series or podcast, if you aren’t already.
The catch with this “Key Moments” feature, for now, is that it only works on YouTube videos. So you’re stuck with sending users to your video on the YouTube website or app, rather than to your website. However, Google has put infrastructure in place (through “Clip” Schema) to enable this feature more widely in the future. They’ve already extended the use of Key Moments to a select few websites. For now, you need to be part of this exclusive trial to set Key Moments in privately hosted videos. Otherwise you’ll just have to accept the limitation and optimize your videos on YouTube.
Adding timestamps (Chapters) to YouTube videos
The good news is that if you have well-optimized content available on YouTube, all you need to do to take advantage of this feature is to add timestamps to your YouTube video descriptions.
1. Write a list of timestamps (Chapters) in your video description
Adding timestamps is very straightforward. Not only will it allow you to receive Key Moments features in Google search, but will ensure your videos are presented with Chapters (links letting users skip to specific moments) across the YouTube platform.
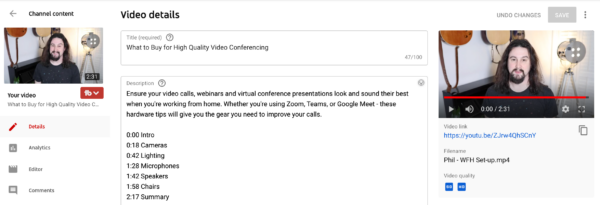
To add timestamps to your YouTube video, you need to edit the “description” within the video details section. Anywhere within this description write the timecodes of each point in the video when you want a new Chapter to appear, as a list. Then next to each timecode, write the name of this Chapter (see the example below):

You can add as many of these timestamps, with corresponding Chapter titles as you want. For videos longer than an hour, timestamps past the hour mark can be expressed with two colons, e.g. 1:34:56. You can make the titles as long as you like (although I recommend staying under 50 characters to prevent titles from being truncated).
It’s really as simple as that. Chapter titles will also be the names of the “Key Moments” when appearing in Google search. So it may be wise to think about titles likely to generate clicks, based on the overall user intent behind the keyword(s) you are optimizing for.
2. Click save.
Once you’ve done this, just simply hit save, and everything is ready to go. When you next view the video on YouTube, you’ll notice that the play bar is segmented into sections. You will also see links to the right of the time indicator. When clicked these will take you to the start of the next Chapter.

Generally speaking, timestamps should be added at the points that make sense in terms of aiding overall navigation and consumption. Moments, when there is a change of subject or a break in conversation, are a good choice. If you need further guidance, have a look at your audience retention graph in YouTube analytics. Any points where you see a “spike”, indicating increased engagement, are probably good points to start a Chapter.
And, that’s it! Once you’ve added timestamps and Chapters in the description of your YouTube video, it is now eligible to receive Key Moments links in Google search.
Adding Key Moments to videos on your website
But how do you benefit from Key Moments for your own website? Is it possible to drive traffic there, rather than YouTube? Unfortunately not, unless you’re part of the select few websites that are currently whitelisted for this feature. However, it doesn’t hurt to set things up, such that in the future you will be able to take advantage of this feature if and when Google opens it up to the wider web.
To optimize the videos on your website, you will need to implement structured data, specifically the Schema.org “clip” property, either via microdata in the body of the page, or via JSON-LD in the head.
Firstly, in addition to the standard data required to optimize a video (details here), you need to add hasPart and Clip information.
If you’re using microdata, it will look like this:
</div>
  <div itemprop="hasPart" itemtype="http://schema.org/Clip" itemscope>
    <meta itemprop="name" content="Cat jumps" />
    <meta itemprop="startOffset" content="30" />
    <meta itemprop="endOffset" content="45" />
    <meta itemprop="url" content="http://www.example.com/example?t=30" />
  </div>
And if you’re using JSON-LD, it will need to look like this:
"hasPart": [{
        "@type": "Clip",
        "name": "Cat jumps",
        "startOffset": 30,
        "endOffset": 45,
        "url": "http://www.example.com/example?t=30"
      }]
Note that both implementations require a start and end stipulated (startOffset & endOffset). This differs from the implementation with YouTube descriptions, where you only need to stipulate the start of the Chapter, and the length is determined by the time to the subsequent Chapter.
The URL you can stipulate here is also very important, so that users can be sent directly to the correct point in the video. Many, but not all video platforms, allow you to stipulate this with a URL parameter. For example, with Wistia, if you append the parameter wtime to a URL (e.g. example.com/blog-post?wtime=34) this will drop you in at the start of the clip.
YouTube does not currently have a feature which by default allows you to adjust the start time of the embedded video using a URL parameter on your website. Therefore, to implement clip schema on your website, in order to benefit from Key Moments if and when they are more widely available for sites on the open web, then you are best off using a video hosting platform other than YouTube.
Want to know more about video SEO? Check out Phil’s advice for improving your online video strategy in the Yoast SEO podcast.
The post How to timestamp YouTube videos and create Key Moments appeared first on Yoast.


